Feb 27, 2010

Daring Bakers: Tiramisu

 I've been reading food blogs for a few years now - and I have always enjoyed the baking and cooking clubs online- it's so much fun to see a bunch of people make the same thing - yet each creation is so unique and often turns out completely different than others.
  There are so many of these groups to choose from - Tuesdays with Dorie, Martha Stewart Cupcake club, the Daring Bakers and Cooks are a few of my favorites.  Only a few months into my own blog and I couldn't wait any longer to join in on the fun!  I decided on the Daring Bakers - since it is only once a month and I knew it would be a way to improve my baking skills and try new things.
  
The February 2010 Daring Bakers’ challenge was hosted by Aparna of My Diverse Kitchen and Deeba of Passionate About Baking. They chose Tiramisu as the challenge for the month. Their challenge recipe is based on recipes from The Washington Post, Cordon Bleu at Home and Baking Obsession

So here is my first challenge:  Tiramisu!  Well, tiramisu is the finished product- you had to make your own mascarpone cheese (!), ladyfingers, zagablione (I never even knew what this was before this challenge), pastry cream, whipped cream and assemble the entire dessert - talk about a challenge - this was easily the most complicated dessert I've ever made!  It took five days to get everything made and chilled overnight before we actually ate it. But the end result was worth it - and it was so much FUN to make! 

I served this on Valentine's Day with my sister's family - my 2 year old niece is still talking about this cake weeks later - these are her exact words -  'Tine's Cake Yummy!' (she calls me 'tine and her yummy sounds like 'nummy') I love her so much!  
And she was right - this was yummy! 
Here is the proof – I followed the recipes exactly – the only substitution was using coffee in the zagablione in place of the marsala wine. 

The homemade mascarpone cheese…actually pretty easy to make

the homemade ladyfingers….so easy to make...they were perfect!
 

the pastry cream, zagablione and mascarpone…
The finished product from the side…mine made two layers...
the finished product from above…
drool worthy slice…
yummy…
just one more look for good measure….
I had so much fun with this months challenge – I can’t wait to see what next month brings!   Head over to Aparna and Deeba blogs for the recipes and thanks for hosting the challenge this month!
Check out other Daring Bakers Tiramisu's on the blogroll!

Feb 26, 2010

Soft Pretzels

Soft pretzels are one of our favorite snacks - there is something really satisfying about the soft, chewy dough and salt combination.   I didn't have to look far for a recipe - since Alton Brown seems to have the go-to recipe for these - and for good reason - they did not disappoint!  I froze the leftovers once they were already baked - and they were just as good re-heated later.  I am definitely going to be making these and keeping them in the freezer for a quick snack - and say goodbye to the old box of Superpretzels!

Ingredients
  • 1 1/2 cups warm (110 to 115 degrees F) water
  • 1 tablespoon sugar
  • 2 teaspoons kosher salt
  • 1 package active dry yeast
  • 22 ounces all-purpose flour, approximately 4 1/2 cups
  • 2 ounces unsalted butter, melted
  • Vegetable oil spray, for pan
  • 10 cups water
  • 2/3 cup baking soda
  • 1 large egg yolk beaten with 1 tablespoon water
  • Pretzel salt (I used sea salt - I could not find 'real' pretzel salt anywhere!)
Directions
1. Combine the water, sugar and kosher salt in the bowl of a stand mixer and sprinkle the yeast on top. Allow to sit for 5 minutes or until the mixture begins to foam. 
2. Add the flour and butter and, using the dough hook attachment, mix on low speed until well combined. Change to medium speed and knead until the dough is smooth and pulls away from the side of the bowl, approximately 4 to 5 minutes. 
3. Remove the dough from the bowl, clean the bowl and then oil it well with vegetable oil spray. Return the dough to the bowl, cover with plastic wrap and sit in a warm place for approximately 50 to 55 minutes or until the dough has doubled in size.
4. Preheat the oven to 450 degrees F. Line 2 half-sheet pans with parchment paper and lightly spray with the vegetable oil. Set aside.
5. Bring the 10 cups of water and the baking soda to a rolling boil in an 8-quart saucepan.
6. Turn the dough out onto a slightly oiled work surface and divide into 8 equal pieces. Roll out each piece of dough into a 24-inch rope. Make a U-shape with the rope, holding the ends of the rope, cross them over each other and press onto the bottom of the U in order to form the shape of a pretzel. Place onto the parchment-lined half sheet pan.
7. Place the pretzels into the boiling water, 1 by 1, for 30 seconds. Remove them from the water using a large flat spatula.
8. Return to the half sheet pan, brush the top of each pretzel with the beaten egg yolk and water mixture and sprinkle with the pretzel salt.
9. Bake until dark golden brown in color, approximately 12 to 14 minutes. Transfer to a cooling rack for at least 5 minutes before serving.

Source: Alton Brown

Feb 25, 2010

Buttermilk Pancake Mix

I love pancakes on Sunday mornings - but I usually end up reverting to a box mix since I don't want to spend the time making some from scratch for just the two of us.  Luckily I finally found my solution - a homemade mix - just add an egg and water and its done!  Could not be easier to do!   These pancakes were light, fluffy and tasted great.  The secret to the great taste is that they use real butter and the mix is stored in the freezer.  It's also super easy to put together with your food processor.  

Ingredients
  • 2 cups unbleached all-purpose flour
  • 2 cups cake flour
  • 1 cup non-fat dry milk powder
  • 3/4 cup malted milk powder
  • 1/3 cup sugar
  • 2 tbsp. baking powder
  • 1 tsp. baking soda
  • 1 tbsp. salt
  • 12 tbsp. (1.5 sticks) unsalted butter, cut into 1/2 inch pieces
  • 6 tbsp. buttermilk powder

Directions
1. Process all of the ingredients in a large food processor - until there are no lumps and the mixture is the texture of sand - at least 2 -3 minutes. 
2. The mix can be frozen for up to 2 months - store in the freezer and not in the pantry or fridge.
3. To make the pancakes - add one lightly beaten egg and 1/4 cup of cold water to 1 cup of the dry mix.  Stir to combine.    Pour pancakes with a 1/4 cup measuring cup - and cook on a pre-heated griddle.   


Feb 24, 2010

Samoas


Samoas - my absolute favorite Girl Scout cookie - and now I can make at home!!!  (And you'll get much more to eat than the what - 9 (!?) that come in the box)  I was so excited when I saw this recipe - they are in a bar form so they are easier to make than cutting and shaping a bunch of circle cookies.  These were unbelievably easy to make and tasted exactly like the authentic Girl Scout cookie.  I think these would be fun to make and have people guess what they are.  Next on my list to try - homemade thin mints! Definitely make these if you need an easy yet impressive dessert to serve.  

Ingredients
Cookie Base
  • 1/2 cup sugar
  • 3/4 cup butter, softened
  • 1 large egg
  • 1/2 tsp. vanilla extract
  • 2 cups all purpose flour
  • 1/4 tsp. salt
Topping
  • 3 cups shredded sweetened coconut
  • 12-oz good-quality chewy caramels
  • 1/4 tsp. salt
  • 3 tbsp. milk
  • 10 oz. dark or semisweet chocolate chips
Directions
1. Preheat oven to 350F.
2. Line a 9×13-inch baking pan with parchment paper.
3. In the bowl of your stand mixer fitted with the paddle attachment, cream together sugar and butter, until fluffy. Beat in egg and vanilla extract.
4. Working at a low speed, gradually beat in flour and salt until mixture is crumbly, like wet sand.
5. Pour crumbly dough into prepapred pan and press into an even layer [tip: use the back of a measuring cup to press in the dough]. 
6. Bake for 20-25 minutes, until base is set and edges are lightly browned. Cool completely on a wire rack before topping.
7. In a dry non stick skillet over medium heat, add the coconut and toast on the stovetop until golden brown [be careful not to burn it!]. Once toasted, set aside and allow to cool.
8. Unwrap the caramels and place in a large microwave-safe bowl with milk and salt. Cook on high for 3-4 minutes, stopping to stir a few times to help the caramel melt. When smooth, fold in toasted coconut with a spatula.
9. Put dollops of the coconut and caramel topping all over the cooled shortbread base. Using a small spatula, spread the topping into an even layer. 
10. Let topping set until cooled. When cooled, cut into 30 bars with a large knife.
11. Once bars are cut, melt chocolate in a small bowl. Heat on high in the microwave in 45 second intervals, stirring thoroughly to prevent scorching.
12. Dip the base of each bar into the chocolate and place on a clean piece of parchment or wax paper.
13. Transfer all remaining chocolate (or melt a bit of additional chocolate, if necessary) into a ziploc bag with the corner snipped off and drizzle bars with chocolate to finish.
14. Let chocolate set completely before storing in an airtight container.


Feb 23, 2010

Garlic Knots

Back before I started my own food blog - these was a time that this recipe was showing up on so many of the food blogs that I follow that I knew I had to try these.   And after making them once - I knew why they were so popular - they are perfect!  Light, fluffy and so easy to make - they were excellent with my pasta with bolognese sauce.  I can't wait to make them again - soon!
Ingredients
Dough
  • 3 cups bread flour
  • 1/4 cup milk
  • 1 tbsp. sugar
  • 2 tsp. instant yeast
  • 1-1/4 tsp. salt
  • 2 tbsp. olive oil
  • 1 cup + 2 tablespoons lukewarm water (about 110 degrees F)
Glaze
  • 2 cloves garlic, minced
  • 2 tablespoons melted butter
  • 1/4 tsp. dried Italian seasoning
Directions
1. In the bowl of a stand mixer fitted with the paddle attachment combine the flour, sugar, yeast and salt together. 
2. Add the olive oil, milk and water, and mix just to combine.
3. Switch to using the dough hook, and knead to form smooth, elastic dough, adding additional water or flour as needed.  (about 8 minutes)
4.Transfer the dough to a lightly greased bowl, cover it with plastic wrap, and allow it to rise for about 1 hour, until it’s doubled in bulk.
5. Divide the dough into 8 pieces, and roll each into a rope about 10 inches long; tie each rope into a knot and tuck in the ends.
6. Place the knots on a lightly greased or parchment lined baking sheet, cover, and let rise for 45 minutes to about an hour.
7. To make glaze - combine the minced garlic, melted butter, and italian seasoning.
8. Brush the knots with the glaze. 
9. Bake the knots in a preheated 350°F oven for 15 to 18 minutes until very lightly browned. 

Feb 22, 2010

Bolognese Sauce

This is an excellent version of Bolognese sauce - which is one of my absolute favorite pasta sauces.   I also made my own pasta - which really put this meal over the top.   The original version is from Mario Batali - who is now one of my favorite chefs.  I used to not be a fan of his - and then I read 'Heat' and it completely changed my opinion of him.   It's a great book - I highly recommend it if you like foodie literature :)  But for now - since it's still cold outside - and if you have a few hours to put this together - go make this sauce!!


Ingredients
  • 2 medium onions, chopped
  • 4 celery ribs, chopped
  • 2 medium carrots, chopped
  • 5 cloves of garlic, minced
  • 1/4 cup extra virgin olive oil
  • 2 pounds ground meatloaf mix (mix of pork, veal and beef)
  • 1 6-ounce can tomato paste
  • 1 28-ounce can diced tomatoes
  • 1 cup dry white wine (I used dry vermouth)
  • 1 cup water
  • 1 teaspoon fresh thyme leaves (or 1/2 tsp. dried thyme)
  • 1 1/2 teaspoons kosher salt
  • 1/2 teaspoon fresh black pepper
  • 1 cup heavy cream
Directions
1. Heat oil in a large dutch oven. Add onions, celery, carrots and garlic and sautee over moderate heat until softened. This should take about 5 minutes.
2. Add ground meat and cook until no longer pink, breaking up the meat as it cooks. This should take about 6 minutes.
3. Add the tomato paste, heating it and mixing it in the cooked meat. 
4. Add the white wine and deglaze the pan. 
5. Add the water, canned tomato and thyme and gently simmer the sauce, covered, until it thickens and reduces, about an hour to an hour and a half. 
6. Once thickened add salt and pepper and heavy cream. Stir.

Source: adapted from Joy the Baker originally from Mario Batali

Feb 18, 2010

Apple Cinnamon Butterscotch Muffins

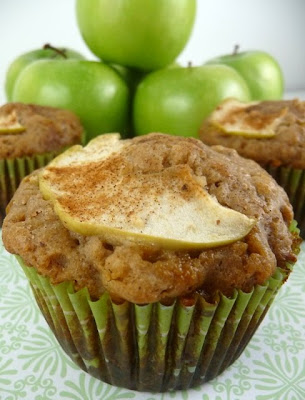
I was in the baking mood one evening - and I could not stop thinking about these muffins once I saw them on Annie's Eats.  I realized I had all of the ingredients on-hand except for the dried apples for on top - so I just decided to slice an apple really thin with a mandolin and it worked out great.   My husband brought these to a group he was working with the next morning - and they were a huge hit!  I can't wait to make them again - they are the perfect mid-morning snack on a chilly day (but hopefully the chilly days will end soon!!)!

Ingredients
  • 2½ cups all-purpose flour
  • 2 tsp. baking powder
  • 1 tsp. baking soda
  • ½ tsp. salt
  • 1¼ tsp. ground cinnamon
  • ¾ cup old-fashioned oats
  • 8 tbsp. unsalted butter, at room temperature
  • ½ cup packed brown sugar
  • 2/3 cup applesauce
  • 2 large eggs
  • 1½ tsp. vanilla extract
  • 1 cup milk
  • ¾ cup butterscotch chips
  • ¾ cup chopped apples
  • 1/3 cup toasted pecans, chopped 
For topping (optional):
  • Dried apple slices (or thinly sliced apples) 
  • Cinnamon-sugar
Directions
1. Preheat the oven to 350˚ F. Spray 2 muffins pans lightly with cooking spray (total of 18-20 muffins) Set aside.  [I used paper liners - but I found the muffins stuck to the paper - so next time I will just cook these directly in the pan]
2. In a medium mixing bowl, combine the flour, baking powder, baking soda, salt, and cinnamon. Mix lightly with a fork to blend. Stir in the oats. 
3. In the bowl of an electric mixer fitted with the paddle attachment, cream together the butter and sugar until light and smooth, 1-2 minutes. 
4. Beat in the applesauce, eggs and vanilla extract until incorporated. 
5. With the mixer on low speed, mix in the dry ingredients in three additions alternately with the milk, beginning and ending with the dry ingredients and beating just until incorporated. 
6. Fold in the butterscotch chips, apples, and toasted pecans with a rubber spatula. 
7. Divide the batter evenly between the prepared muffin cups. 
8. If desired, press an apple slice into the top of the batter in each cup. Sprinkle lightly with cinnamon sugar. 
9. Bake about 18-20 minutes, or until a toothpick inserted in the center comes out clean. Cool in the pan for 5-10 minutes, then transfer to a wire rack to cool completely.

Source: Annie's Eats, originally from  Sugar Plum
 

Feb 17, 2010

Cheddar Scallion Biscuits

I was looking around for a copy-cat recipe for Red Lobster Cheddar bay biscuits - but I didn't want to use Bisquick.   So this recipe was perfect - they were very easy to whip up and tasted great.  I served them with my favorite chili-rubbed salmon and a veggie - and they were great.  I froze the leftovers and I just ate one the other day - and it tasted as good as it did the day I made them.   I don't know how similar they are to Red Lobster though - since I can't remember the last time I ate there - but I do know they make good biscuits!
I thought it was fitting to photograph these on this plate that I got a few years back at a Buffalo China sale - they are actually plates that were originally made for Red Lobster!  See the cute fish swimming around the plate?! :)

Ingredients
  • 1 cup plus 2 tbsp. all-purpose flour
  • 1 1/4 tsp baking powder
  • 1 tsp sugar
  • 1/2 tsp baking soda
  • 1/2 tsp seasoned salt salt
  • 6 Tbsp (3/4 stick) cold unsalted butter, cut into 1/2-inch cubes
  • 1 cup (4 oz.) grated Cheddar cheese
  • 3 scallions, finely chopped
  • 1/2 cup buttermilk  (I used 2 tbsp. dried + 1/2 cup water)
  • 2 tbsp. unsalted butter, melted1/2 tsp. dried Italian seasoning

Directions
1. Preheat oven to 425°F.
2. Whisk together flour, baking powder, sugar, baking soda and salt, in a bowl, then blend in butter with your fingertips or a pastry blender until mixture resembles coarse meal.
3. Stir in Cheddar and scallions.
4. Add buttermilk and stir until just combined.
5. Drop dough in 6 equal mounds about 2 inches apart onto a baking sheet.
6. Bake in middle of oven until golden, 15 minutes.
7. While baking, combine the melted butter and Italian seasoning. Brush butter-herb mixture over hot biscuits once baked.

Source: adapted from the Piggly-Wiggly, originally from Gourmet

Feb 16, 2010

Sesame Chicken

This recipe is not the ordinary sesame chicken that you would likely order from a Chinese restaurant - that version is so thick with breading you can hardly find the meat - and when you do it's tough and chewy.  This version is extremely flavorful with moist chicken and a kick of heat.  I love that it uses black sesame seeds - I think they provide a lot more interest in the presentation of this dish.  My husband and I really enjoyed this - definitely something I'll continue to make as an easy weeknight dinner.  I scaled down the original recipe to only make it for two - but you can easily double or triple this recipe as needed.

Ingredients
  • 2 boneless, skinless chicken breasts
  • 1/2 tsp. sesame oil 
  • 2 tsp. Chinese garlic chili sauce
  • 1/2 cup. Panko bread crumbs
  • 1/4 tsp. garlic powder
  • 1/4 tsp. salt
  • 1/4 tsp. ground pepper 
  • 2 tsp. black sesame seeds
  • 1 tsp. olive oil
Directions 
1. In medium bowl, combine chicken, sesame oil and garlic chili sauce. Coat well and place in fridge (marinate chicken for at least 20 minutes and up to 2 hours).
2. Remove from fridge when ready to cook and place a nonstick pan on stove over medium heat.  Add olive oil and heat over medium until almost smoking.
3. Preheat oven to 350 degrees.
4. In a shallow bowl, add bread crumbs, garlic powder, salt, pepper, sesame seeds and toss to combine.
5. Place chicken breast into bread crumb mixture and coat well. 
6. Place into hot pan and repeat with remaining chicken breast. 
7. Cook until golden in color on one side, about 2-3 minutes and flip.  Cook an additional 2-3 minutes and place pan into preheated oven.
8. Bake until internal temperature of 160 is achieved (do not over cook) and remove, about 10-15 minutes.


Feb 15, 2010

Hummus

This recipe is very similar to the cilantro hummus recipe I've posted before - except there is no cilantro or any jalapenos in this version.  Hummus is definitely one of my favorite snacks - I served this with some chicken souvlaki that I made - it was the perfect accompaniment to dip your pita or veggies (my favorites are cucumbers and red pepper strips)! 

Ingredients
  • 1 clove garlic, peeled
  • 3 tbsp. freshly squeezed lemon juice (from 1-2 lemons)
  • 4 tbsp. water
  • 6 tbsp. tahini, stirred well
  • 2 tbsp. extra virgin olive oil, plus more for drizzling
  • 1 (14 oz.) can garbanzo beans, drained and rinsed (reserve 2 tbsp. for garnish)
  • 1/2 tsp. salt
  • 1/4 tsp. cumin
  • dash of cayenne pepper
Directions
1.Combine the garlic, garbanzo beans, salt, cumin and cayenne in the bowl of a food processor.  Pulse until the ingredients have been finely minced.  Scrape down sides of bowl. 
2. In a small bowl, combine the lemon juice and water.
3. In another bowl, whisk together the tahini and olive oil.
4. With the machine running add the lemon juice-water mixture in a steady stream through the feed tube.  Scrape down the bowl and continue to process for one minute.
5. With the machine running, add the oil-tahini mixture in a steady stream through the feed tube, and continue to process until smooth and creamy, about 15 seconds, scraping down the bowl as needed.
6. Transfer the hummus to a serving bowl, garnish with reserved garbanzo beans, another dash of cayenne pepper and a drizzle of olive oil, cover and refrigerate at least 30 minutes to allow flavors to meld.  Serve with tortilla chips, pita bread, carrots, celery, etc.

Feb 12, 2010

Chicken Tortilla Soup

We love this soup!  It has an authentic mexican taste - it's flavorful and just a little spicy.  It's a really great soup if you or someone you love is not feeling well - it will definitely make them feel better :)  The homemade tortilla strips are fantastic and so easy to make.   The soup recipe seems complicated - but it's really not - I've made this many times on a weeknight. Enjoy!
Ingredients
Tortilla Strips:
  • 8 corn tortillas (6 inch), cut into 1/2 inch wide strips
  • 1 tablespoon vegetable oil
  • kosher salt
Soup:
  • 2-3 large boneless-skinless chicken breasts (about 1.5 lbs)
  • 8 cups low sodium chicken broth
  •  1 large white onion, peeled and quartered
  • 4 cloves garlic, peeled and left whole
  • 8 to 10 sprigs fresh cilantro
  • 1 sprig fresh oregano (I omitted this if not available)
  • 1/2 teaspoon salt to taste
  • 2 medium tomatoes , cored and quartered
  • 1 small jalapeno pepper, seeded and halved
  • 1 chipolte chile en adobo and up to 1 tbsp. of adobo sauce
  • 1 tablespoon vegetable oil
Garnishes:
  • 1 lime, cut into wedges
  • 1 Hass avocado, diced
  • shredded Mexican cheese blend
  • fresh cilantro leaves
  • sour cream 
Directions
Tortilla Strips:
1. Heat oven to 375 degrees. 
2. Spread tortilla strips on rimmed baking sheet; drizzle with oil and toss until evenly coated. Bake until strips are deep golden brown and crisped, about 15-20 minutes, rotating pan and shaking strips (to redistribute) halfway through baking time. 
3. Season strips lightly with salt; transfer to plate lined with several layers paper towels.
Soup:
1. In a large pot, bring chicken breasts, broth, 2 onion quarters, 2 garlic cloves, cilantro, oregano and 1/2 teaspoon salt to boil over medium-high heat.
2. Reduce heat to low, cover, and simmer until chicken is just cooked through, about 20 minutes. Using tongs, transfer chicken to large plate and allow to cool. Once cool, shred chicken into bite sized pices. Leave the broth in the pot with solids; set aside.
3. Place the tomatoes, 2 remaining onion quarters, 2 garlic cloves, jalapeño, chile and adobo in food processor until smooth.
4. Heat oil in Dutch oven over medium-high heat until shimmering; add tomato/onion puree and cook, stirring frequently, until mixture has darkened in color, about 10 minutes.
5. Place a large mesh strainer over the Dutch oven and carefully strain the chicken broth into the tomato mixture. Discard any solids caught in the mesh strainer. 
6. Bring the soup to boil, then reduce heat to low and simmer to blend flavors, about 15 minutes.
7. Add the shredded chicken and simmer until heated through, about 5 minutes. 
8. To serve, place portions of tortilla strips in bottom of individual bowls and ladle soup into bowls; pass garnishes separately.
 

Feb 11, 2010

Beef Tacos

This recipe seriously changed my entire view of what a hard shell taco should taste like.  They are so authentic tasting - and the favoring for the beef filling is spot-on.  Make sure you do not skip the step of frying your own hard shells - that is the key piece of this recipe that cannot be replicated with a store-bought hard shell. It really is not that hard to do - any only takes a few extra minutes to complete.  You will not be able to turn back after tying these - they are too good not to love.

Ingredients
Beef Filling:
  • 2 tsp. vegetable oil
  • 1 small onion, chopped small (about 2/3 cup)
  • 3 medium cloves garlic, pressed through garlic press (about 1 tbsp.)
  • 2 tbsp. chili powder
  • 1 tsp. ground cumin
  • 1 tsp. ground coriander
  • 1/2 tsp. dried oregano
  • 1/4 tsp. cayenne pepper
  • Table salt
  • 1 pound 90% lean ground beef
  • 1/2 cup tomato sauce
  • 1/2 cup low-sodium chicken broth
  • 1 tsp. brown sugar
  • 2 tsp. vinegar (preferably cider vinegar)
  • Ground black pepper
home fried taco shells:
  • 3/4 cup corn, vegetable or canola oil
  • 8-12 6-in. corn tortilla
topping suggestions:
  • shredded cheese
  • shredded iceburg lettuce
  • diced tomatoes
  • sliced olives
  • chopped fresh cilantro
  • sour cream
  • diced onion
  • diced avocado

Directions
for the beef filling:
1.Heat oil in medium skillet over medium heat until hot and shimmering but not smoking, about 2 minutes; add onion and cook, stirring occasionally, until softened, about 4 minutes. 2. Add garlic, spices, and 1/2 teaspoon salt; cook, stirring constantly, until fragrant, about 1 minute. 
3. Add ground beef and cook, breaking meat up with wooden spoon and scraping pan bottom to prevent scorching, until beef is no longer pink, about 5 minutes. 
4. Add tomato sauce, chicken broth, brown sugar, and vinegar; bring to simmer. 
5. Reduce heat to medium-low and simmer, uncovered, stirring frequently and breaking meat up so that no chunks remain, until liquid has reduced and thickened (mixture should not be completely dry), about 10 minutes. Adjust seasonings with salt and pepper.
for the home-fried shells:
1. Heat oil in a small heavy-bottomed skillet or saucepan over medium heat until it reaches 350 degrees.  
2. Line a rimmed baking sheet with paper towels. 
3. Using tongs to hold tortilla, place half of tortilla into oil.  With metal spatula in the other hand - keep half of tortilla submerged in oil - fry for 30 seconds. 
4.  Flip tortilla - hold tortilla open about 2 inches while keeping bottom submerged in oil - fry until golden brown - about 1 to 2 minutes.  Flip and fry other side for 30 more seconds until golden. 
5. Transfer to paper lined baking sheet and place upside down.  Repeat process with remaining tortillas.  
to serve:
Using wide, shallow spoon, divide filling evenly among taco shells. Serve immediately, passing toppings separately. 


Feb 10, 2010

Hello Dollies


If I was forced to choose my favorite dessert - it would be Hello Dollies.  It is actually one of the few things that I bake that I don't need a recipe to follow since I've made them so many times.  They really are the perfect combination of ingredients and so quick and easy to make.  They are actually my go-to recipe when I need to make something quick - I almost always have the ingredients on hand to make these.   And they are so adaptable - I didn't have any plain graham crackers this time - so I used chocolate ones (and I think chocolate may have been slightly better than plain!).  I also used a combination of walnuts and pecans - but you can use any type of nut you have on hand.  The part that can't be substituted is the coconut or the sweetened condensed milk.  I love this dessert so much - I want to go make another batch right now just thinking about it.  Enjoy!

Ingredients
  • 2 cups graham cracker crumbs (about 1 1/2 packages chopped in your food processor)
  • 1 tbsp. sugar
  • 1 stick (1/2 cup) unsalted butter, melted
  • 1 cup nuts (walnuts, pecans, hazelnuts, etc or a mix), roughly chopped
  • 1 cup of chocolate chips (bittersweet, semi-sweet or milk chocolate)
  • 1 cup of sweetened flaked coconut
  • 1 can (14 oz.) sweetened condensed milk (I use fat free - just to save a few calories!)

Directions
1. Preheat oven to 350 degrees.
2. Melt butter in a glass 8x8 inch square pyrex baking dish.  Add in graham cracker crumbs and sugar and stir to combine. 
3.  Press graham cracker mixture firmly into the bottom of the dish.
4.  Layer nuts, chocolate and coconut.   Pour condensed milk over the top - using a small rubber spatula to spread evenly. 
5.  Bake for 20 minutes or until golden brown on top (do not overbake).
6.  Let cool - then serve! 


I don't really have a source for these - since I've been making them for so long this way.
 
Printer-friendly version

Feb 9, 2010

Baked Chicken Egg Rolls

This is something I made to go along with the chicken fried rice.  I've always wanted to make my own egg rolls - since they are so much healthier than the fried version you get from a Chinese restaurant.  I was really surprised at how similar the inside filling was to the actual filling inside a typical restaurant egg roll.  I omitted the shrimp from the original recipe, since I'm not a huge fan of shrimp - but I actually think this would have tasted even better with the shrimp.  I'll definitely try these again to experiment some more.   I used olive oil cooking spray to coat these before baking - and they really crisped up nicely.  Definitely a fun recipe to try out. 

Ingredients
  • 1 small boneless skinless chicken breast, cooked and roughly chopped
  • Napa cabbage, enough for 2 cups shredded
  • 1 medium carrot, peeled
  • 2 tsp. canola oil
  • 3 cloves garlic, finely minced
  • 2 tsp. fresh grated ginger
  • 1 tbsp. oyster sauce
  • 1 tsp. fish sauce
  • 1 cup fresh bean sprouts
  • 2 tbsp. chopped fresh cilantro
  • 1 package egg roll wrappers
  • 1 egg white, lightly beaten
  • Cooking spray
Directions
1. Combine the chicken breast in the bowl of a food processor.  Mince with brief pulses until chicken is finely chopped.  Transfer to a bowl; set aside.  
2. Replace the blade of the food processor with the shredding attachment.  Shred the cabbage to yield 2 cups.  Shred the carrot.  Transfer the cabbage and carrot to a bowl; set aside. 3. Heat 2 teaspoons oil over medium-high heat.  Cook garlic and ginger just until fragrant, about 30 seconds.  Add the shredded cabbage and carrot to the pan and sauté just until the carrot is slightly tender, about 3 minutes.
3. Add the chicken to the pan.  Mix in the oyster sauce, fish sauce and bean sprouts.  Stir until well combined.  Remove from the heat and stir in the chopped cilantro.
4. Preheat the oven to 400 degrees F.  On a work surface, orient an egg roll wrapper with a point toward you.  Place about 2 tablespoons of filling near the edge of the wrapper.  Flip the point up over the filling, rolling away from you to cover the filling.  Fold both sides in and continue to roll.  Use a dab of egg white on the loose point of the wrapper to help seal the roll completely.  Transfer to a baking sheet lined with parchment paper.  Repeat with the remaining wrappers and filling.
5. Spray the rolls lightly with cooking spray.  Bake until golden brown and slightly bubbly, about 15-20 minutes.

Source: adapted from Annie's Eats

Printer-friendly version

Feb 8, 2010

Chicken fried rice

Fried rice is something that I almost never get with Chinese take-out.  I always make sure I'm getting white or brown rice with my meal.  But for some reason the idea of homemade chicken fried rice really appealed to me.  This recipe makes a LOT of food - so it is great for a crowd or you might want to halve it.  I ended up eating it for lunch three days in a row and I never got sick of it - so that in itself is a testament of how good it was.

Ingredients
  • 1 tsp. sesame oil
  • 1 onion, diced
  • 1.5 lbs cooked, cubed chicken breasts
  • 2 carrots, diced
  • 2 stalks celery, diced
  • 1 large red pepper, diced
  • 1/2 lb. snow peas
  • 6 cups cooked rice (note: make this a day ahead of time for the best results)
  • 2 eggs, lightly beaten
  • 1/3 cup plus 2 tbsp. soy sauce
  • 3 green onions, sliced
Directions
1. Heat sesame oil in a large wok or skillet.  Add onion, carrots, celery and pepper.  Cook until softened 5 - 6 minutes.
2. Add in chicken and 2 tbsp. soy sauce.   Stir to combine.  Then add in snow peas, continuing to stir. 
3.  Add in rice and stir throughly to combine and heat the rice.
4.  Add in 1/3 cup soy sauce and eggs.  Cook until eggs are cooked and rice is golden brown. Garnish with green onions.  

Source: adapted from Allrecipes

Feb 5, 2010

Black bean burgers

I was traveling for work a few weeks back and I had a black bean burger topped with guacamole and pico de gallo at Max and Erma's in the airport.  I don't normally like going to chain restaurants but sometimes you have no choice and I like to go to ones that I don't have where I live.  I was so happy to have made the right choice - since after I had this burger I could not stop thinking about it.   I couldn't find a knock-off recipe online - but I remember that I saw this recipe on Sanda Lee's show one time.  So this was the perfect opportunity to try it out.  I am so glad I did - both my husband and I really enjoyed this - it's a great healthy, fulfilling meal.  I used wholy guacamole and fresh pico de gallo.  I can't wait to have this again soon (we actually have three more left in the freezer!).

Ingredients
  • 1 medium yellow onion
  • 1 garlic clove
  • 2 (15-ounce) cans black beans, rinsed and drained, divided
  • 2 tbsp. freshly chopped cilantro leaves
  • 2 tsp. freshly chopped parsley leaves (I used 1 tsp. dried)
  • 1 egg
  • 1/2 tsp. red pepper flakes
  • 1/2 cup bread crumbs
  • salt and pepper
  • 1 tbsp. olive oil
Directions
1. In a food processor, pulse onion and garlic until finely chopped.  Add 1 can black beans, cilantro, parsley, egg, and red pepper and pulse to combine.
2. Transfer mixture to a large mixing bowl, add the remaining can of black beans and the bread crumbs. Season with salt and pepper, to taste, and mix until well combined.
3. Divide remaining mixture into 5 (or 6) portions and form into patties - refrigerate for 30 minutes to firm up. 
4. Place 1 tbsp. oil in pan or grill pan over medium heat and cook about 6 minutes a side or until heated through. 
5. Serve on toasted buns and top with guacamole and pico de gallo.

Feb 4, 2010

Pico de Gallo

There are not many things better than fresh pico de gallo to beat the winter blues.  Even with sub-par tomatoes since they are not in season right now - this is still delicious.   It is great to eat with tortilla chips or on fajitas.  But I served this on top of black bean burgers (recipe coming tomorrow!) - it was perfect!

Ingredients
  • 5-7 plum tomatoes, seeded, cored and diced
  • 1 small red onion, diced
  • 1 jalapeno pepper, ribs and seeds removed and diced
  • 1 garlic clove, minced
  • the juice of 1 lime
  • 1 tbsp. extra virgin olive oil
  • a handful of fresh cilantro, chopped (approximately 4 tbsp. but I don't measure this)
  • 1 tsp. kosher salt
Directions
1. Chop tomatoes, onion, pepper, garlic and cilantro.
2. Combine all ingredients in a small bowl and allow flavors to meld for approximately 30 minutes (or overnight) before serving.  

Feb 3, 2010

Egg in a hole

Growing up - when ever I was sick my mom would make something called 'egg on toast' for my sister and myself.  It was a soft boiled egg served over a piece of toast.  To this day - one of the foods I want when I'm not feeling well is eggs and toast.  So when I stayed home sick from work one day last week, I decided to try this new version of 'egg on toast' - essentially it's egg in toast - but it goes my many different names - egg in a hole is the one I prefer.  I'm not sure how I managed to go 30 years without eating this - but I am glad I discovered it.  It is much so simple to make and fun to eat.  
Ingredients
  • 1 slice Of Your Favorite Kind Of Bread
  • 1 whole Egg
  • 1 tsp. Butter
  • Salt to taste
  • Pepper to taste
Directions
1. With a biscuit cutter, the rim of a glass or a cookie cutter -  press a hole in the center of the slice of bread.
2. Heat a skillet over medium-low heat and melt the butter in it. Place the piece of bread in the skillet and crack the egg straight into the center of hole.
3. Cook for at least 30 seconds or so before attempting to move the bread. Sprinkle the egg with salt and pepper to taste. After about a minute, flip it over with a spatula and salt and pepper the other side.  (I also added in cut-out piece of bread to the pan to toast - it is great for dipping into the egg yolk!)