Showing posts with label dinner. Show all posts

Sep 4, 2012

Pesto Turkey (or Chicken) Burger

pesto turkey burger 1

I pretty much only cooked on our grill for the entire Summer – it was just too hot in the kitchen!   Also the main reason I haven’t been doing any baking either!   But these pesto turkey (or chicken) burgers are just too good to pass up.  I liked that the pesto was a mix of spinach and basil – so it wasn’t overpowering and provided even more nutrients.   Enjoy this for the rest of Summer while it lasts!

Ingredients

  • 1 cup fresh basil leaves
  • 1 cup baby spinach
  • 1 clove garlic
  • 1/4 cup walnuts
  • 4 Tbsp. olive oil
  • salt and pepper
  • 1 lb. ground turkey or chicken
  • fresh tomato slices
  • sliced fresh mozzarella
  • burger buns

Directions 

1. In a food processor, combine the basil, spinach, garlic and walnuts.   Add in the oil while the machine is running.  Add in 1 Tbsp. of water and season with salt and pepper.  Scrape down sides of the bowl until pesto is all combined.

2. Heat grill over medium-high.   Combine 1 Tbsp. pesto, 3/4 tsp. salt, 1/4 tsp. pepper and chicken or turkey and form into 4-5 patties. 

3. Grill patties, covered for about 4 –6 minutes.  Flip patties and top with cheese.  Add tomatoes to the grill and grill until lightly charred.  Toast buns.

4.  Assemble burgers with tomatoes and extra pesto.  

Source: Everyday Food July/Aug 2012

Printer-friendly version

Jun 25, 2012

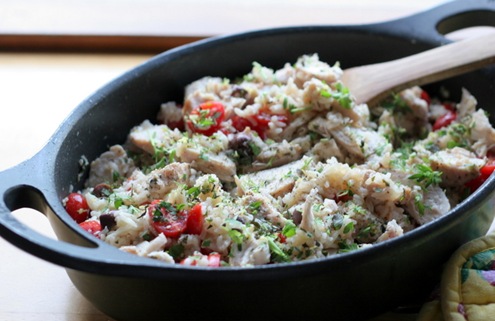
Mediterranean Chicken and Rice

mediterranean chicken and rice 1

We had a very unusual winter this year for Buffalo, NY.  You know – the place that people think is buried in feet of snow every day in the winter.   Well, we barely had any this year – and if we did it melted right away.   I think we did snowblow the driveway one time the entire winter – which is unheard of.   So this Summer when I was inspecting my herb garden – I was shocked to see that so many things that usually don’t survive the winter were growing – parsley, sage, rosemary. 

So I was excited to have my summer stash of fresh herbs for cooking ready and available without a trip to the market for plants.  

This was a really flavorful, easy one dish meal. We love Mediterranean flavors so this was definitely a keeper.  The only caveat was that it was not that great as leftovers – something about olives being re-heated in the microwave just threw this off for me when I was eating it the next day.  Otherwise – enjoy!  

mediterranean chicken and rice 2

Ingredients

  • 1/3 cup of pitted kalamata olives, chopped plus 1/4 cup of olive brine reserved
  • 1/4 cup olive oil
  • 2 Tbsp. minced fresh oregano
  • 4 garlic cloves, minced
  • 1 Tbsp. grated lemon zest
  • salt and pepper
  • 4 boneless, skinless chicken breasts
  • 2 cups low-sodium chicken broth
  • 1 cup long-grain white rice
  • 1 onion, diced
  • 4 oz. cherry or grape tomatoes, halved
  • 1/4 cup minced fresh parsley

Directions

1. Combine olive brine, 3 Tbsp. oil, 1 Tbsp. oregano, 2 minced garlic cloves, 2 tsp. lemon zest, 1 1/2 tsp. salt and 1/2 tsp. pepper in a ziploc bag.  Pat chicken dry and place in bag – shake to coat.  Refrigerate for 1 to 2 hours, turning occasionally.

2. Remove chicken from bag and pat dry.  Heat 1 1/2 tsp. oil in 12-inch nonstick skillet over medium-high heat.  Cook chicken until browned – about 3-5 minutes per side.  Transfer to plate and set aside.

3. Microwave 1 1/4 cups broth and rice in a covered large bowl until liquid is absorbed – 6 to 8 minutes, stirring halfway through cooking.

4. Add remaining 1 1/2 tsp. oil and onion to now-empty skillet and cook over medium heat until softened – about 5 minutes.  Stir in 2 tsp. oregano and remaining garlic.  Add in remaining 3/4 cup of broth and rice and bring to a boil, scraping up any browned bits.

5. Return chicken to skillet and cook, covered over medium-low until the meat registers 160 degrees F and the rice is tender – about 8 to 12 minutes.   Transfer chicken to cutting board, tent with foil and let rest for 10 minutes.

6. Off heat, stir in olives, tomatoes, and 2 Tbsp. parsley into rice.  Slice chicken into 1/2 inch slices and sprinkle with a mixture of remaining 2 Tbsp. parsley, 1 tsp. oregano and 1 tsp. lemon zest.  Season with salt and pepper and serve. 

Source: Cooks Country Feb/Mar 2012

Printer-friendly version

Jun 6, 2012

Weeknight Spaghetti and Meatballs

weeknight spaghetti and meatballs 1

Whenever I make meatballs – the first night we always have meatball subs or ‘bombers’ as we like to call them.   Partly because it’s enough work to mix the meatballs and cook them and I often don’t want to also boil water and cook pasta.   And then we rarely have leftover meatballs to use with pasta since my husband will eat a meatball bomber everyday of the week until they are gone. 

So that is why I liked the idea of this ‘weeknight’ spaghetti and meatballs – one dish and get both your pasta and your meatball! 

weeknight spaghetti and meatballs 2

Ingredients

  • 1 lb. meatloaf mix
  • 1/3 cup panko bread crumbs
  • 1 large egg, lightly beaten
  • 5 garlic cloves, minced
  • 1 Tbsp. olive oil
  • 1 (28 oz.) can crushed tomatoes
  • 2 cups water
  • 8 –12 oz. spaghetti, broken in half
  • 1/4 cup chopped fresh basil
  • salt and pepper

Directions

1. Combine meat, bread crumbs, egg, 3 minced garlic cloves, 1 tsp. salt and 1 tsp. pepper in bowl and knead until combined. 

2. Form into 1-inch meatballs and preheat oil in a 12-inch skillet until smoking.   Cook meatballs until browned all over; transfer to a plate and set aside.

3. Add remaining 2 minced garlic cloves to the skillet and cook until fragrant, about 30 seconds.  Add tomatoes, water and pasta and bring to a boil.  Cover, and reduce heat until medium-low, stirring often until pasta begins to soften, about 7 minutes.  

4. Return meatballs to pan and simmer, covered, until meatballs are cooked through and pasta is al dente, about 5 minutes longer.   Off heat, stir in basil and season with salt and pepper.

Source: Cook’s Country Feb/Mar 2012

Printer-friendly version

May 16, 2012

Greek Pizza

greek pizza 1

This was one of those meals that I kept moving around on my menu plan for one reason or another.   And then when I finally made it I regretted every second that I didn’t make it sooner. 

greek pizza 2

Even though it looks complex – this pizza was actually a really easy dinner.  I had a ball of pizza dough already in the freezer to use – or you could use store bought.  The base is a simple olive oil and some spices.  The toppings included some diced artichoke hearts, katamala olives, sliced red onion, sun-dried tomatoes, cooked chicken (plan ahead and have this already cooked!), feta and mozzarella cheeses.  Just a bit of rough chopping and the prep was complete and this pizza was ready to be baked. 

greek pizza 3

The combination was as close to perfection as you can get.   I don’t know if they even eat pizza like this in Greece – but it doesn’t even matter – it is delicious just the way it is. 

Enjoy! 

greek pizza 5

Ingredients

  • 1 batch pizza dough, homemade or store-bought
  • ~2 Tbsp. Olive oil
  • ~1/2 tsp. Garlic powder
  • ~1/2 tsp. dried oregano
  • 1 1/2 cups shredded mozzarella cheese
  • 6 oz. grilled chicken breast strips, chopped
  • 1/4 cup thinly sliced red onion
  • 6 sun-dried tomatoes, diced
  • 1/4 cup canned quartered artichoke hearts, chopped
  • 1/4 cup pitted kalamata olives, sliced in half
  • 1/4 cup crumbled feta cheese
  • ~1 tsp. dried parsley

Directions

1. Preheat the oven to 450 degrees F.

2. Roll dough out to form a large round. Brush with olive oil and sprinkle with garlic and oregano.

3. Spread half of the mozzarella evenly over the top, then add the rest of the toppings, ending with the other half of the mozzarella, then the feta cheese and parsley.

4. Bake in the preheated oven for about 12 minutes, or until the crust is baked through and golden brown.

Source: adapted from Pennies on a Platter

Printer-friendly version

May 2, 2012

Chicken Parmesan Baked Pasta

chicken parm bake pasta 1

I tend to gravitate towards any meal that is called “chicken parmesan”. Something about the combination of breaded chicken, pasta, tomato sauce and lots of cheese gets me every time.   The combination is usually a multi-step process involving at least two or three pots or pans and lots of time.  But this dish is one pot (as long as your skillet if oven-proof) and way easier than it looks. 

chicken parm bake pasta 3

The end result tastes so good you would hardly know how easy this really was to make! 

Enjoy!  

p.s. I’ll be on vacation to the great foodie city of Seattle all next week – so have a great week! 

chicken parm bake pasta 2

Ingredients

  • 1 (28-oz.) can crushed fire-roasted tomatoes
  • 1 Tbsp. olive oil
  • 6 garlic cloves, minced
  • 1/4 tsp. dried oregano 
  • 1/8-1/4 tsp. crushed red pepper flakes
  • kosher salt and freshly ground black pepper
  • 2 cups water
  • 1 - 1 1/2 cups low-sodium chicken broth
  • 12 oz. pasta shapes (ziti, penne, fusilli etc.)
  • 1 cup grated Parmesan cheese 
  • 1 cup shredded mozzarella cheese
  • 1 lb. cooked chicken tenders, chopped into bite-sized pieces
  • 1/4 cup chopped fresh basil

Directions

1. Cook the oil, garlic, red pepper flakes, and 1/4 teaspoon of salt in a 12-inch oven-proof skillet over medium-high heat until fragrant, about 1 minute. 

2. Stir in the tomatoes, water, 1 cup of the broth, and the pasta.  Bring to a vigorous simmer, cover, and cook until pasta is tender, 15 to 18 minutes, stirring often.

3. Stir in 3/4 cup of the Parmesan, 1/4 teaspoon of pepper, and the chopped chicken. If the pasta seems dry, stir in the remaining 1/2 cup of broth.  Sprinkle with mozzarella and remaining Parmesan.

4. Preheat the oven to 475 degrees.  Bake 5 to 10 minutes, or until the cheese is melted and bubbly.  Sprinkle with basil and serve.

Source: Pink Parsley, originally from America's Test Kitchen, Pasta Revolution

Printer-friendly version

Apr 30, 2012

Crockpot Honey Sesame Chicken

crockpot sesame chicken 1

I’ve said this time and time again – but there is nothing better than coming home from work and having dinner practically ready for you.   Unfortunately there are not tons of crockpot meals that I love.  I find that the texture of whatever you make is usually the same – mushy.  But this dish was great because all you had to do was shred the chicken and cook some rice and some green beans (if you desire).  The texture of the chicken was what you would expect from the crockpot – but the sauce and the rice made this dish complete. 

Enjoy!

crockpot sesame chicken 2

Ingredients (I made half of this recipe for the two of us)

  • 4 boneless skinless chicken breasts
  • salt and pepper
  • 3/4 cup honey
  • 1/4 cup soy sauce
  • 1/2 cup diced onion
  • 1/4 cup ketchup
  • 2 Tbsp. canola oil
  • 2 cloves garlic, minced, pressed or grated
  • 1/4 tsp. red pepper flakes
  • 4 tsp. cornstarch
  • sesame seeds
  • sliced green onions

Directions

1. Season both sides of chicken with lightly with salt and pepper, put into crock pot.

2. In a small bowl, combine honey, soy sauce, onion, ketchup, oil, garlic and pepper flakes. Pour over chicken.

3. Cook on low for 3-4 hours or on high 1 1/2 – 2 1/2 hours, or just until chicken is cooked through. Remove chicken from crock pot, leave sauce.
Dissolve cornstarch in 6 tablespoons of water and pour into crock pot. Stir to combine with sauce. Replace lid and cook sauce on high for ten more minutes or until slightly thickened.

4. Shred chicken or cut into bite size pieces, then return to pot and toss with sauce. Serve chicken over rice, garnish with sesame seeds and green onions.

Source: The Balanced Baker

Printer-friendly version

Apr 26, 2012

Chicken and Spinach Flautas

chicken and spinach flautas 1

My husband is a fan of ordering flautas when we go out for Mexican food (although it is rare that we do – excluding Chipolte, of course!).  So I was happy when I found this recipe – my husband was sad because he wanted me to fry them. But they are baked for a reason – its healthier and easier this way.  I’m not going to say it tastes better – because I’m not going to lie a fried tortilla is pretty darn good.   But the ooey gooey cheese and spinach and chicken tasted great!

I also wouldn’t say this is a great weeknight meal – since you have to cook the chicken, spinach and then roll and bake the flautas – which all in all takes a while.  It didn’t help that I also made my own guacamole and mexican rice – so I was definitely beat when I finished cooking these.  Thank goodness for margaritas!  Enjoy!

chicken and spinach flautas 2

Ingredients

  • 2 boneless, skinless chicken breasts
  • 1 1/2 cups chicken broth
  • 2 cups water
  • 1 tsp. Kosher salt
  • 1 tsp. garlic powder
  • 1 tsp. ground cumin
  • 1 tsp. chili powder
  • 1 Jalapeno pepper, ribs and seeds removed, minced
  • 2 cups baby spinach, chopped
  • 12 flour tortillas (8 inch)
  • 6 ounces shredded Colby jack cheese
  • cooking spray

Directions

1. Preheat the oven to 450 degrees F.

2. In a large saucepan, combine the chicken broth, water, salt, garlic powder, cumin, chili powder and half of the jalapeno. Add the chicken to the pan and bring to a boil, reduce the heat and simmer for 20 minutes.  Remove the chicken and shred with two forks once cooled a bit.

3. Pour out all but 1/4 cup of the cooking liquid. Add the remaining jalapeno and spinach; cook over low heat for a couple minutes, until the spinach is wilted.

4. Spoon a heaping tablespoon of the chicken mixture near the edge of the tortilla. Add a spoonful of spinach and cheese over top of the chicken. Roll the tortilla up tightly. Place seam-side down on a greased cookie sheet. Repeat with remaining tortillas.

5. Spray the prepared flautas with cooking spray. Bake for 10 minutes, flip over and back for 5 to 10 minutes more until the tortillas are golden brown.

Source: So Tasty, So Yummy

Printer-friendly version

Apr 4, 2012

Crockpot Tex-Mex Chicken Stew

crockpot tex mex chicken soup

Nothing is better than having dinner practically done when you get home from work.   I really need to start using my crockpot more during the work week.  This soup has a bit of prep with chopping all the vegetables – so I prepped this on a Sunday afternoon for dinner on Monday evening.   My husband works from home so he was able to turn the crockpot on around noon and dinner was ready by the time I got home.   It is a really delicious and healthy soup.  I will certainly be making this again!   Enjoy!

Ingredients

  • 1 large yellow onion, minced
  • 1 red bell pepper, seeds and ribs removed, chopped
  • 1 jalapeno, seeds and ribs removed, minced
  • 6 garlic cloves, minced
  • 1 Tbsp. tomato paste
  • 1 Tbsp. vegetable oil
  • 1 Tbsp. chili powder
  • 2 tsp. ground cumin
  • 1/8 tsp. cayenne pepper
  • 4-6 cups low-sodium chicken broth 
  • 1 (14.5 oz.) can diced tomatoes, drained 
  • 1/4 cup Minute Tapioca
  • 1 Tbsp. brown sugar
  • 1 lb. boneless, skinless chicken breasts, trimmed of excess fat
  • salt and pepper
  • 2 cups frozen corn
  • 1 (15-oz.) can black beans, drained and rinsed
  • 1 minced chipotle chile in adobo sauce
  • 1/4 cup minced fresh cilantro

Directions

1. Microwave the onions, peppers, garlic, tomato paste, oil, chili powder, cumin, and cayenne in a large bowl, stirring occasionally, for about 5 minutes, or until the vegetables are softened.  Transfer to the slow cooker.

2. Stir the broth, tomatoes, tapioca, and sugar into the slow cooker.  Season the chicken with salt and pepper and nestle into the slow cooker.  Cover and cook until the chicken is tender, 4 to 6 hours on low.

3. Transfer the chicken to a large cutting board, and when it's cool enough to handle, shred into bite-sized pieces.

4. Return the chicken the slow cooker, stir in the beans, corn, and chipotle chile, cover, and cook on high until heated through, about 10 minutes.  Stir in the cilantro, season with additional salt and pepper as needed, and serve.

Source: adapted from Pink Parsley, originally from Slow Cooker Revolution

Printer-friendly version

Feb 7, 2012

Chicken wraps w/black bean salsa and guacamole

chicken wraps

I am always looking for easy, healthy lunches and dinners.   As soon as I saw this recipe I knew it was right up my alley – it reminded me of something I would order if I saw it on the menu at a deli.  I made this much easier on myself by buying a pre-cooked rotisserie chicken and shredding it myself.   So I just had to mix up the black bean salsa and the guacamole.   I loved every bit of this sandwich – I would probably eat it every day if I could – I ate it for dinner one night, then lunch the next two days.  I doubt I would even grow tired of it if I did!  Enjoy!

Ingredients

For the guacamole:

  • 2 ripe avocados
  • 1/4 cup red onion, finely chopped
  • 1/4 cup cilantro, finely chopped
  • 3 Tbsp. fresh lime juice
  • 3/4 tsp. kosher salt
  • 1 jalapeño, seeded and finely chopped

For the black bean salsa:

  • 1 can black beans, rinsed and drained
  • 1/4 cup diced red bell pepper
  • 2 Tbsp. red onion, finely chopped
  • 1 tomato, seeded and diced
  • 1 Tbsp. chopped cilantro
  • 1 green onion, chopped
  • 1 Tbsp. jalapeño, finely minced
  • 1 Tbsp. olive oil
  • 1/2 tsp. kosher salt
  • 1/2 cup corn (defrosted if frozen)
  • 1 tsp. ground cumin

To assemble:

  • 6 large spinach or whole wheat wraps
  • 2 roasted chicken breasts, diced or shredded
  • 4-5 cups baby spinach leaves
  • Monterey jack cheese, shredded

Directions

1. To make the guacamole: split the avocados and remove the pits.  Scoop the flesh into a medium bowl.  Mash with a fork until smooth.  Add in the onion, cilantro, lime juice, salt, and jalapeño.  Continue mashing until it has a fluffy, whipped texture.  Adjust seasonings to taste.

2. To make the black bean salsa: combine all of the ingredients in a large bowl.  Toss to combine and refrigerate to allow the flavors to mingle.

3. Briefly microwave the tortillas or wraps to warm them and make them malleable.  Place a tortilla on a work surface and spread 2 tablespoons of guacamole on top.  Add about 1/4 cup of the cooked chicken to the bottom third of the tortilla.  Top with 3 tablespoons of the black bean salsa,  a handful of baby spinach leaves and a sprinkle of cheese.

4. Roll the bottom edge up and over the fillings, fold the sides inward, and roll tightly the rest of the way, burrito-style.  Place on a cutting board and slice diagonally. 

Source: adapted from Annie’s Eats

Printer-friendly version

Feb 2, 2012

Sesame crusted Salmon

sesame crusted salmon 1

Salmon is really the only fish that I buy consistently.   In an effort to not waste too much food – I try to plan my meals each week so that some dinners give leftovers and some don’t.  So salmon is one of my easy go-to items to make when I already have a fridge full for leftovers for lunches.

[I would never make extra salmon to bring to work for lunch – I am not going to be that person who stinks up the entire office by reheating fish in the microwave]

I loved how perfect the sesame seeds crusted onto the salmon – I burnt my finger getting that perfection!   But it was worth it – so is the quick pan sauce you make to dip the salmon in.  I served this with some rice and some roasted sugar snap peas – seriously a perfect meal!  Enjoy!

sesame crusted salmon 2

Ingredients

for the glaze:

  • 2 Tbsp. soy sauce
  • 1 Tbsp. mirin
  • 1/4 cup low-sodium chicken broth
  • 1/4 tsp. sugar
  • 1 clove garlic, minced
  • 1 tsp. cornstarch
  • 1 1/2 Tbsp. cold water

for the salmon:

  • 1 large egg white
  • 1 Tbsp. cornstarch
  • 2 salmon fillets, about 8 oz. each
  • 2 Tbsp. sesame seeds
  • 2 Tbsp. vegetable or canola oil

Directions

1. To make the glaze: combine the soy sauce, mirin, chicken broth, sugar and garlic in a small bowl; whisk to blend.  In another small bowl, combine the cornstarch and water and whisk until smooth.

2. To make the salmon: combine the egg white and cornstarch in a shallow dish and whisk to blend.  Brush the skinless side of each salmon fillet with the egg white mixture. 

3. Place the sesame seeds in a second shallow dish.  Dip the side of the salmon fillets with the egg mixture in the sesame seeds and press gently to coat completely.

4. Heat the oil in a large skillet over medium-high heat.  When the oil is hot, place the salmon in the pan, seeded side down, and cook for about 5 minutes or until the sesame seeds are golden brown.  Turn and continue cooking an additional 3 minutes or until cooked through (about 130 degrees F).  Remove to a plate, tent with foil, and set aside.

5. Pour off any oil remaining in the skillet and lower the heat to medium.  Add the soy sauce mixture to the pan and simmer for 2 minutes, stirring constantly.  Whisk in the cornstarch-water mixture and continue simmering until the sauce has thickened, about 1 minute more.  Serve immediately with the warm salmon fillets.

Source: Annie’s Eats

Printer-friendly version

Jan 23, 2012

Italian Wedding Soup

italian wedding soup 2

I am submitting this post to Branny’s Souper Bowl For every entry she receives, she’ll donate $1.00 to the ASPCA!  She knows how important the work they do is – and how special pets are to their owners. 

I thought this soup was fitting one to represent how much my husband and I  love our dog.  So much, that he was the ringbearer in our wedding.   You never would have expected that I was the same girl, who as a child - would scream and cry if a dog came within 100 feet of me – had a dog in her wedding!  I was deathly afraid of dogs – and honestly I never ever wanted to have one anyway.  So of course, I fell in love with someone who hardly ever lived without a dog in his life.  For years, he would tell me how much he wanted a dog – and I just brushed him off.  I hardly know how it happened – but I suggested we go look at some puppies – and what I didn’t know at the time is that – you can't just go “look” at puppies (you end up taking one home with you!).  That is exactly what happened to us.  And it’s changed my life for the better in so many ways.  The excited greeting I get every.single.time I come home, the warm cuddles on the couch, kisses when he jumps into bed with us, dropping a toy at my feet when he wants to play, falling asleep at the crook of my knees when I take a nap, unconditional love that I’ve never gotten before (since he is my first dog!).  I’ve even told my husband – I can’t imagine my life without a dog – ever again.  

Back to the soup – this is definitely a keeper.  It was easy too – especially if you make the meatballs in advance.  Super fulfilling and nutritious.  Enjoy!

italian wedding soup 1

Ingredients

for the meatballs:

  • 1 lb. ground chicken
  • 1/2 lb. mild chicken Italian sausage (casings removed)
  • 2/3 cup fresh white bread crumbs
  • 2 garlic cloves, minced
  • 3 Tbsp. chopped fresh parsley or 1 Tbsp. dried
  • 1/2 cup grated parmesan cheese
  • 3 Tbsp. milk
  • 1 egg, lightly beaten
  • Kosher salt and black pepper

for the soup:

  • 2 Tbsp. olive oil
  • 1 cup minced yellow onion
  • 1 cup diced carrots (3 carrots)
  • 3/4 cup diced celery (2-3 stalks)
  • 8 –10 cups reduced-sodium chicken broth
  • 1/2 cup dry white wine
  • 1 cup small pasta (I used Acini di pepe)
  • 7 oz. baby spinach, washed and trimmed

Directions

1. Preheat the oven to 350 degrees F.  Line a baking sheet with parchment paper.

2. For the meatballs: Place the ground chicken, Italian sausage, bread crumbs, garlic, parsley, Parmesan cheese, milk, egg, 1 teaspoon salt, and 1/2 teaspoon black pepper in a bowl.  Mix gently until well combined.  Form the mixture into 1- to 1 1/4-inch meatballs and place onto the prepared baking sheet.  Bake for 30 minutes, until cooked through and lightly browned, flipping over meatballs about halfway though baking.  Set aside.

3. For the soup: Heat the olive oil over medium heat in a large Dutch oven.  Add the onion, carrots, and celery and saute until softened, 5-6 minutes. 

4. Add the chicken broth and wine and bring to a boil.  Add the pasta to the simmering broth and cook for 6-8 minutes or until al dente.  Add the meatballs to the soup and simmer for 1 additional minute.  Stir in the fresh spinach and cook for 1 minute, until the spinach is just wilted.  Ladle into soup bowls and sprinkle with Parmesan cheese, if desired.

Source: adapted from Barefoot Contessa: Back to Basics by Ina Garten

Printer-friendly version

Dec 19, 2011

Lentil Marinara

lentil marinara 1

It’s that time of year that you need to eat healthy meals during the week in order to balance out all of the extra sweets and snacks that turn up everywhere you go.  This lentil marinara is just that – super healthy and really filling.  I ate it for lunch two days in a row – and I was so full I barely had room for dinner at night. 

It’s a great vegetarian alternative to meat sauce, it definitely has more depth than just plain marinara sauce since the lentils give it a nice texture.  Also – this recipe makes a pretty big batch – so feel free to halve it or freeze the leftovers for later.  Enjoy!

lentil marinara 2

Ingredients

  • 2 Tbsp. olive oil
  • 1 onion, diced
  • 4 garlic cloves, minced
  • 1/4 teaspoon red pepper flakes
  • 1/2 tsp. dried oregano
  • 1 tsp. dried basil
  • 1/4 cup white or red wine
  • 2 (28-ounce) cans whole tomatoes, coarsely chopped
  • 1 (1-pound) bag lentils, rinsed and picked over
  • 3 cups water
  • 1 tsp. salt

Directions

1. In a large saucepan heat the oil over medium heat.  Add the onion and a pinch of salt and cook, stirring occasionally, until the onion just starts to brown around the edges, about 8 minutes.  Add the garlic, red pepper flakes, oregano and basil and cook, stirring constantly, until fragrant, about 30 seconds.

2. Add in the wine, scraping any browned residue on the bottom of the pan.  Increase the heat to medium-high and add the remaining ingredients.

3. Bring to a simmer, then reduce the heat to medium-low and cook, stirring occasionally, about 30 - 45 minutes, until the lentils are tender and the sauce is thickened.

Source: adapted from The Way the Cookie Crumbles

Printer-friendly version

Dec 12, 2011

Baked Ziti with pesto

baked ziti with pesto

Now that the winter is no doubt upon us – I am ready for baked pasta dishes.  There is something so satisfying and comforting about pasta baked with sauce and cheeses. 

baked ziti with pesto 2

This version mixes in some pesto sauce right in with the ricotta cheese mixture.  Its an easy way to get that fresh herb taste – without having to buy fresh herbs!  I can’t just walk into my backyard and pick some fresh basil anymore – so this is perfect.   My grocery store has a great olive bar that also has fresh-made pesto – so I bought just the amount that I would need for this recipe. 

Enjoy!

baked ziti with pesto 3

Ingredients

  • 1 pound ziti
  • 2 Tbsp. olive oil
  • 1 onion, chopped fine
  • 2 cloves garlic, minced
  • 1 (28 oz.) can crushed tomatoes in thick puree
  • 1/4 tsp. salt
  • 1 bay leaf
  • 1/2 tsp. fresh-ground black pepper, divided
  • 1 cup ricotta cheese
  • 2 cups grated Mozzarella cheese, divided
  • 1/3 cups Parmesan cheese, divided
  • 1/4 cup store-bought or homemade pesto

Directions

1. Heat the oven to 350 degrees F.  Spray a 9 x 13 inch baking dish with cooking spray.

2. In a medium-sized saucepan, heat the oil over medium heat.  Add the onion and cook stirring occasionally, until translucent, about 5 minutes.  Add the garlic and cook, stirring, for 30 seconds.  Add the tomatoes, salt and bay leaf. 

3. Bring to a simmer over medium heat and cook until very thick, about 15-20 minutes.  Stir in 1/4 tsp. of the pepper.  Remove the bay leaf.

4. In a large pot of boiling salted water, cook the pasta for 7 minutes.  (It will be partially cooked). Drain.

5. In a medium bowl, combine the ricotta, 1 cup of the mozzarella, 3 Tbsp. of the Parmesan, the pesto and remaining 1/4 tsp. pepper.

6. Put half of the cooked pasta into the prepared baking dish and top with about a third of the tomato sauce.  Spread the ricotta mixture on the sauce in an even layer.  Cover with the remaining pasta and then the remaining sauce.  Top with the remaining 1 cup of mozzarella and the rest of the Parmesan. 

7. Bake, covered with foil about 30 minutes; then remove foil and bake for an additional 5-10 minutes, until top begins to brown.  Let rest 10 minutes before cutting.

Source: adapted from Bake-aholic

Printer-friendly version

Nov 9, 2011

Sausage, spinach gnocchi soup

sausage gnocchi soup 1

I kept moving this soup around my weekly menu – I just wasn’t in the mood for it.   Then I finally had to make it – since baby spinach does not last forever in the fridge!   I’ve since regretted every second I didn’t make this soup sooner.   

sausage gnocchi soup 2

It’s so comforting and filling – sausage, spinach, red peppers, and potato gnocchi in a chicken broth.   My husband kept saying, “I really really like this soup!” while eating it.   My grocery store had ‘mini’ gnocchi – which were perfect for this soup – so use those if you can find them (I shop at Wegmans by the way)  Enjoy!

sausage gnocchi soup 3

Ingredients

  • 1 yellow onion, diced
  • 1 red pepper, diced
  • 1 Tbsp. olive oil
  • Kosher salt and fresh black pepper
  • 1 pound chicken or turkey Italian sausage, ground or removed from casings, hot or sweet
  • 4 garlic cloves, minced
  • 1 tsp. dried basil
  • 32-48 ounces low-sodium chicken broth
  • 1 pound gnocchi (mini or regular)
  • 2 cups fresh baby spinach leaves,
  • Parmesan cheese, fresh grated, for serving

Directions

1. In a large pot over medium heat, pour in olive oil and sautĂ© onion and red pepper until tender, 5-8 minutes.  Season with salt and pepper.

2. Add the sausage to the pot to brown, breaking it apart as it cooks.  When sausage is cooked add garlic to pot and sautĂ© until fragrant, about 30 seconds.

3. Add the basil and chicken broth and simmer for 20 minutes.

4. Add gnocchi and spinach, bring to a simmer and cook until gnocchi puff up and start to float (check package for cooking time). Serve with Parmesan cheese.

Source: adapted from Cinnamon Girl Recipes

Printer-friendly version

Nov 7, 2011

Beef and black bean chili

beef and black bean chili 1

It’s definitely fall – which means time for chili!  There are so many different varieties – you can get pretty crazy with your ingredients and toppings.  My work recently had a chili cook-off and while I didn’t participate as a cook – I did taste them.  And I have to say – I am a purist when it comes to chili – I don’t like it when people mix too many crazy things (can you say pineapple, three different kinds of meats and chocolate?).  Its just too much!!  So what I like about this chili is that its simple – beef and black beans, with lots of chili powder spices and topped with fresh cilantro, red onion and monterey jack cheese.   I served it with Frito scoops – I love Fritos – I don’t buy them too often but they were great to dip in this chili.  Enjoy!

beef and black bean chili 2

Ingredients

  • 3 (15 oz.) cans black beans
  • 1 can (14.5 oz.) diced tomatoes
  • 1 diced chipotle chili pepper (in adobo sauce) 
  • 1 Tbsp. olive oil
  • 1 lb. lean ground beef 
  • 1 medium red onion, diced
  • 2 Tbsp. chili powder
  • Pinch ground chipotle chili powder (optional)
  • 2 1/2 tsp. ground cumin
  • 2 cups beef stock 
  • 2 Tbsp. tomato paste
  • Juice of 1/2 lime
  • 1/4 cup fresh cilantro, chopped
  • Kosher salt and fresh ground black pepper, to taste

Directions

1. Drain two cans black beans into colander and rinse well, set aside.  Let beans drain while you use a food processor to puree the third can of undrained beans, diced tomatoes and liquid, and the diced chipotle chili pepper.  Process the beans and tomatoes about 1 minute, until they are fairly smooth.

2. In a Dutch oven, heat olive oil and then add  beef, using a wooden spoon to break it into small pieces.

3. Remove beef to bowl and set aside.  Add a bit more olive oil to the pot and the onions.  Lower heat a little and cook onions until they are softened but not starting to brown.  Add all the chili powders and cumin and sautĂ© about 30 seconds.

4. Add beef stock, browned ground beef, pureed bean mixture, drained beans, and tomato paste and simmer over low heat, uncovered, 1 to 1 1/2 hours.  Stir the chili occasionally to prevent any sticking on the bottom of the pot.  After 45 minutes, check the seasonings and add more chili powder, salt, and/or pepper as needed.

5. Just before serving, stir in the chopped cilantro and lime juice and cook about 5 minutes.  Serve chili hot with toppings of your choice.

Source: Smells like Home

Printer-friendly version

Oct 26, 2011

Korean Beef Tacos

korean beef tacos 2

My husband I were big fans of the Great Food Truck Race on Food Network – a fun reality show without too much drama.  Except for the cheating Korilla BBQ team.  Even before they got kicked off the show for cheating I was really intrigued by the Korean BBQ tacos that they were always making – they looked and sounded so good.  I have no idea where I could find something similar in Buffalo – so it was perfect when I came across this recipe.  Although, I’m not really sure if these taste anything like the ones they make – but it doesn’t really matter since they were so good.

The beef is cooked in a slow cooker – and let me just say – the smell was.out.of.this.world – I think it was all of the umami from the soy sauce permeating the kitchen.  I was worried that this would end up making too much for the two of us – but my husband ended up eating all of the leftovers for lunches – so you know that means it was a good recipe.  Enjoy!

korean beef tacos

Ingredients

For the Korean beef:

  • ~2.5 lbs beef short ribs 
  • 2/3 cup low sodium soy sauce
  • 1/2 cup packed brown sugar
  • 3 cloves garlic, minced
  • 2 Tbsp. ginger, grated
  • 3 Tbsp. rice vinegar
  • 1 Tbsp. dark sesame oil
  • 1 Tbsp. vegetable or olive oil
  • 1 Tbsp. sriracha
  • 1/3 cup water

For the Cucumber Slaw:

  • 1/2 seedless cucumber
  • Thinly sliced red onion rounds
  • 1/4 tsp salt
  • 1 Tbsp rice vinegar
  • crushed red pepper flakes to taste

For the tacos: 

  • 8 small wheat tortillas
  • fresh cilantro
  • bean sprouts
  • Greek yogurt (or sour cream)
  • sriracha

Directions

1. To make the Korean beef: Spray your slow cooker crock with non-stick cooking spray and add the ribs.

2. Whisk soy sauce, sugar, and vinegar with the garlic, ginger, sriracha, oils and water.  Pour over the ribs in the crockpot.  Cook on low for 6 to 8 hours.

3. To make the cucumber slaw: Slice the cucumber very thinly and sprinkle with salt.  Place in a colander and let sit for up to an hour over a bowl or in the sink.  Shake additional water from the colander or pat with paper towels.  Transfer to a bowl and toss with red onions, rice vinegar, and red pepper flakes.  Refrigerate until ready to use.

4. When the beef is done cooking remove 3/4 cup of the cooking liquid and skim the fat from the top. Pour the liquid into a small sauce pan and bring to a boil. Reduce heat and simmer while separating the meat from the bones. Reduce the liquid by about half and pour over the shredded meat.

5. To assemble, serve the shredded meat on warmed tortillas topped a spoon of cucumber slaw, cilantro, bean sprouts, sriracha and a dollop of yogurt.

Source: Confessions of a Foodie Bride

Printer-friendly version

Oct 24, 2011

Turkey Veggie Burgers

turkey veggie burgers 1

Turkey burgers have always been one of my favorite easy meals.  I was intrigued by this version with zucchini and carrot added in the mix – you can’t go wrong with just a few more veggies in the dinner.  And they did not disappoint – super moist and flavorful. 

These were likely the very last item I cooked on our grill for the season – winter is way too cold around here to stand outside cooking.  Luckily I enjoy cooking on a grill pan in the wintertime – so I can still enjoy grilled foods all year long.  Even better since I got 8 burgers out of this recipe and have a bunch in the freezer for a quick dinner.  Enjoy!

turkey veggie burgers 2

Ingredients

  • 1 1/2 lb. ground turkey
  • 1 medium zucchini, grated
  • 1 medium carrot, grated
  • 3 cloves garlic, minced
  • 1/2 tsp. paprika
  • spash worcestershire sauce
  • 3/4 tsp. kosher salt
  • 1/4 tsp. black pepper
  • 1 large egg
  • 1/4 cup panko bread crumbs
  • 1 Tbsp. olive oil

Directions

1. Shred zucchini and carrots. Mince garlic.

2. Combine zucchini, carrots, garlic, paprika, worcestershire, salt, pepper, egg, bread crumbs, and turkey in a bowl.  Shape mix into 8 patties.

3. Heat oil in large skillet or grill pan (or grill) over medium heat.

4. Cook the patties (about 4-5 minutes per side) until no longer pink. Serve on toasted buns with your favorite condiments.

Source: Beantown Baker

Printer-friendly version

Oct 19, 2011

Chicken with Tomato herb pan sauce

chicken with tomato herb pan sauce 1

This is one of those recipes that I flagged to make mostly because my husband loves tomatoes.  So I had it on our weekly menu but it kept getting moved around and delayed – but I finally made it - and I regret every second that I didn’t make it sooner.  It was one of those dinners where I kept saying “mmm,mmm,mmm” while eating it.   I know this will become one of my go-to recipes in the future when I need a quick, easy and very tasty dinner.  Enjoy!

chicken with tomato herb pan sauce 2

Ingredients

For the chicken:

  • 2 boneless, skinless chicken breasts, butterflied and halved (4 halves total)
  • Salt and pepper
  • 3/4 cup flour

For the sauce:

  • 2 Tbsp. unsalted butter, softened
  • 1 clove garlic, minced
  • 1 1/2 tsp. fresh oregano, minced
  • 1/2 tsp. sweet paprika
  • Salt and pepper
  • 2 tsp. olive oil
  • 2 cups cherry or grape tomatoes
  • 1/3 cup dry white wine or chicken broth
  • 1 Tbsp. minced fresh parsley

Directions

1. Season both sides of the chicken breasts with salt and pepper.  Lightly dredge both sides of the chicken in the flour, shaking off the excess.  Set aside.

2. In a small bowl, combine the butter, garlic, oregano, and paprika.  Season with salt and pepper. 

3. In a large skillet over medium-high heat, melt 1 tablespoon of the oregano butter with the olive oil.  Place the chicken breast halves in the skillet and cook until golden brown on each side and cooked through, about 3-4 minutes per side.  Transfer to a plate, cover loosely with foil, and set aside.

4. Add the tomatoes to the skillet.  Cook, stirring occasionally, until the tomatoes begin to char and burst, about 5 minutes.  Add the remaining butter to the pan.  Crush the tomatoes slightly to release their juices and continue stirring until the butter is melted.  Add the wine or broth to the pan, scraping the bottom to loosen the browned bits and cook for about a minute more.

5. Slice the chicken, transfer to serving plates, and top with the pan sauce.  Sprinkle with parsley and serve.

Source: Annie’s Eats, originally from Bon Appetit, July 2011

Printer-friendly version

Oct 17, 2011

Turkey and Stuffing bake

turkey and stuffing bake 1

We’re still over a month away from Thanksgiving – but this recipe is the perfect solution if you are craving Thanksgiving dinner early and don’t want to put the full effort in.   I served it with some mashed potatoes and broccoli – warm, comforting and delicious.  I really enjoyed the leftovers for lunch as well – I love Thanksgiving dinner and flavors – now if only I could take a nap afterwards at work.  Enjoy!

turkey and stuffing bake 2

Ingredients

  • 1 Tbsp. extra-virgin olive oil
  • 1 lb. boneless, skinless turkey breasts, chopped into 1-inch chunks
  • 1/2 tsp. dried sage
  • 1/2 tsp. poultry seasoning
  • 2 Tbsp. flour
  • 1 3/4 cup chicken broth
  • coarse salt and pepper
  • 1/2 yellow onion, diced
  • 2 stalks celery, diced
  • 4 cups of cubed bread (I used a mix of white and whole wheat)
  • 1/3 cup dried cranberries
  • 1 large egg, lightly beaten
  • 1 Tbsp. unsalted butter, cut into small pieces

Directions

1. Preheat oven to 425 degrees F.

2. In a large skillet, heat 1/2 Tbsp. oil over medium-high heat.  Add turkey and cook until lightly browned – about 8 minutes.  Add sage, poultry seasoning and flour and stir to coat.  Add in 3/4 cup of broth and cook, stirring and scraping up any brown bits until liquid is thickened – 2 minutes.

3. Season turkey with salt and pepper and transfer to an 8-inch square baking dish, set aside.

4. Wipe out skillet and add remaining oil over medium heat.  Add onion and celery and cook until softened – about 8 minutes.  

5. Remove from heat and add in bread, cranberries and remaining 1 cup broth, stir to combine.  Add in egg and mix thoroughly.  

6. Spoon bread mixture over turkey mixture and dot the top with the butter. 

7. Bake in oven until juices are bubbling and the bread is golden brown – about 20 minutes. 

Source: adapted from Everyday Food October 2011

Printer-friendly version

Oct 14, 2011

Crispy Southwest Chicken Wraps

crispy soutwest chicken wraps 3

I was so excited when I found this recipe – the title is immediately mouthwatering.  I knew this is something we both would enjoy.  Next time I need to plan ahead better and use leftover rice and chicken instead of making them just for this recipe – but other than that – this recipe is easy, delicious, and healthy.  Yum - enjoy!

crispy southwest chicken wraps 2

Ingredients

  • 1 cup cooked rice, warm or at room temperature
  • 1 cup cooked, shredded chicken
  • 1 (15 oz.) can black beans, rinsed and drained
  • 1 green onion, finely sliced (white and green parts)
  • 1/2 red pepper, seeded and diced
  • 1/4 cup fresh cilantro, chopped
  • juice of 1 lime
  • 1/2 Tbsp. chili powder
  • 1 tsp. ground cumin
  • 1/2 tsp. garlic salt
  • 2 cups shredded monterey jack cheese
  • 6-8 burrito-sized flour tortillas

Directions

1. Mix rice together with chili powder, cumin and garlic salt then add in the chicken, beans, green onion, pepper, cilantro and lime juice.

2. Sprinkle cheese over tortillas, leaving 1/2-inch border around edges, then arrange chicken and rice mixture down the center of each tortilla.  Fold and roll stuffed tortillas into a burrito. Spray the tortillas all over with cooking spray.

3. Heat a large non-stick skillet (or griddle) over medium heat for 1 minute. Arrange 2 wraps, seam-side down, in pan and cook until golden brown and crisp, about 2-3 minutes per side. Transfer to a plate and repeat with remaining wraps. Serve immediately.

Source: Mel’s Kitchen CafĂ©

Printer-friendly version