Showing posts with label breakfast. Show all posts

Apr 2, 2012

English Muffin Bread

english muffin bread 1

Sorry for my unannounced absence this past month – some things came up and I needed to take a break from the blog.  Now I’m back and I hope my readers are still out there?!  

This recipe has been on my radar screen for a long time.  I finally got around to making it and I was thrilled with the result.  If you are a newbie to baking with yeast – this is the perfect recipe to try out.  It could not have been easier – you essentially just mix the ingredients together and hardly even knead the dough – let it rise and bake. 

english muffin bread 2

The smell of this bread fresh out of the oven is too good to describe.  I immediately cut off the end and spread a bit of butter on it and enjoyed a bite.    I also thought this bread was perfect for dunking in runny egg yolks – yum!   Enjoy!

english muffin bread 3

Ingredients

  • 3 cups All-Purpose Flour
  • 1 Tbsp. sugar
  • 1 1/2 tsp. salt
  • 1/4 tsp. baking soda
  • 1 Tbsp. instant yeast
  • 1 cup milk
  • 1/4 cup water
  • 2 Tbsp. vegetable oil or olive oil
  • cornmeal, to sprinkle in pan

Directions

1. Whisk together the flour, sugar, salt, baking soda, and instant yeast in a large mixing bowl.

2. Combine the milk, water, and oil in a separate, microwave-safe bowl, and heat to between 120°F and 130°F. 

3. Pour the hot liquid over the dry ingredients in the mixing bowl.

4. Beat at high speed with the paddle attachment for 1 minute. The dough will be very soft.

5. Lightly grease an 8 1/2" x 4 1/2" loaf pan, and sprinkle the bottom and sides with cornmeal.

6. Scoop the soft dough into the pan, leveling it in the pan as much as possible.

7. Cover the pan with plastic wrap, and let the dough rise till it's just barely crowned over the rim of the pan (about 45 minutes to 1 hour)

8. Preheat the oven to 400°F.

9. Remove the cover, and bake the bread for 22 to 27 minutes, till it's golden brown and its interior temperature is 190°F.

10. Remove the bread from the oven, and after 5 minutes turn it out of the pan onto a rack to cool. Let the bread cool completely before slicing.

Source: King Arthur Flour

Printer-friendly version

Jan 31, 2012

Chocolate Biscotti

chocolate biscotti 3

I haven’t always been a coffee drinker – but I’ve found myself needing a cup of coffee more and more lately.  I think its sufficed to say that I am now a coffee drinker.   Luckily biscotti goes perfectly with a hot drink of your choice.

I have a close friend that is an avid tea drinker – and she loved the last biscotti recipe that I made.   So for her birthday I decided to make her a batch of biscotti to enjoy with some fun tea flavors. 

chocolate biscotti 1

You can never go wrong with chocolate – never!  This recipe has a combination of white and dark chocolates.  I think the next time I make this I will put in walnuts in place of the white chocolate.  I think it will give them a better texture and not that overly-sweet flavor of the white chocolate.

Enjoy! 

chocolate biscotti 2

Ingredients

  • 2 cups all-purpose flour, plus some extra for dusting
  • 1/2 cup unsweetened cocoa powder
  • 2 Tbsp. instant espresso powder
  • 3/4 tsp. baking soda
  • 1/4 tsp. baking powder
  • 1 tsp. salt
  • 6 Tbsp. unsalted butter, at room temperature
  • 1 cup sugar
  • 2 large eggs, lightly beaten
  • 1 tsp. vanilla extract
  • 1 cup white chocolate chips or walnuts
  • 4 oz. bittersweet chocolate, coarsely chopped

Directions

1. Center a rack in the oven and preheat to 350 degrees F.  Line a baking sheet with parchment paper or a silicone mat.

2. Sift together the flour, cocoa powder, espresso powder, baking soda, baking powder and salt.

3. In the bowl of a stand mixer fitted with the paddle attachment, beat the butter and sugar together on medium speed until pale, about 2 minutes; the mixture may be crumbly. 

4. Scrape down the sides of the bowl, add the eggs and the vanilla and beat for another 2 minutes.  Reduce the mixer speed to low and mix in the dry ingredients in three additions, mixing only until a dough forms.  Scrape down the sides of the bowl.  Mix in the white chocolate chips or nuts and chopped bittersweet chocolate.

5. Sprinkle some flour on a clean work surface.  Dust your hands with some flour – the dough may be very sticky.  Divide the dough in half.  Working with one half at a time, roll the dough into 10-inch logs.  Transfer logs onto the baking sheet.  Flatten both logs so that they are 1/2 to 1 inch high and at least 4 inches apart.

6. Bake the logs for at least 25 minutes, or until are just slightly firm.  The logs will spread and crack during baking.  Remove the baking sheet from the oven, place on a wire rack and allow to cool for about 20 minutes.

7. Working with one log at a time, cut each log into slices 1/2 to 3/4 inch thick.  Stand the slices up on the baking sheet.  Bake the cookies again, this time for 10 minutes.  Transfer to a rack to cool.

Source: Annies Eats originally from Baking: From My Home to Yours by Dorie Greenspan

Printer-friendly version

Jan 16, 2012

Overnight Cinnamon Rolls

cinnamon rolls 1

This is my very first attempt at cinnamon rolls – I wanted to attempt the classic cinnamon version with cream cheese icing. 

This is Alton Brown’s recipe – and as anyone knows – he’s got his recipes down to a perfect science.  Here is a photo of him from when my husband and I saw him last year do a live cooking demo:  P1090512

He’s very entertaining to watch and listen.  I would definitely recommend going to see him.  On the other hand, we recently went to watch a former Top Chef winner do a live demo – and we actually left in the middle of it - it was so bad.  So there is definitely something to be said for someone with experience cooking and explaining recipes in front of an audience/tv.

cinnamon rolls 2

So it’s no surprise that these turned out perfect!  My oven has a ‘proofing’ feature – so I used that in place of the ‘place boiling water in a pan in the oven’ to allow a quick rise before these are baked.   So I put these in to rise – and actually went back into bed for a bit. 

I also froze half of the dough at the stage before they get the overnight rise.  So I’ll have to defrost them in the fridge overnight – and continue the recipe the same way, when we want to have these again!  

Enjoy!

cinnamon rolls 4

cinnamon rolls 3

Ingredients

Dough:

  • 4 large egg yolks, room temperature
  • 1 large whole egg, room temperature
  • 1/4 cup sugar
  • 6 Tbsp. unsalted butter, melted
  • 3/4 cup buttermilk, room temperature
  • 4 cups (20 oz.) all-purpose flour, plus additional for dusting
  • 2 1/4 tsp. (1 package) instant dry yeast
  • 1 1/4 tsp. kosher salt
  • cooking spray

Filling:

  • 1 cup light brown sugar
  • 1 Tbsp. ground cinnamon
  • Pinch salt
  • 1 1/2 Tbsp. unsalted butter, melted

Icing:

  • 1/4 cup ounces cream cheese, softened
  • 3 Tbsp. milk
  • 1 1/2 cups powdered sugar

Directions

1. For the dough: In the bowl of a stand mixer with the whisk attachment, whisk the egg yolks, whole egg, sugar, butter, and buttermilk. Add approximately 2 cups of the flour along with the yeast and salt; whisk until moistened and combined.

2. Remove the whisk attachment and replace with a dough hook. Add all but 3/4 cup of the remaining flour and knead on low speed for 5 minutes. Check the consistency of the dough, add more flour if necessary; the dough should feel soft and moist but not sticky. Knead on low speed 5 minutes more or until the dough clears the sides of the bowl.

3. Turn the dough out onto a lightly floured work surface; knead by hand about 30 seconds. Lightly oil a large bowl. Transfer the dough to the bowl, lightly oil the top of the dough, cover and let double in volume, 2 to 2 1/2 hours.

4. Combine the brown sugar, cinnamon and salt in a medium bowl. Mix until well incorporated. Set aside.

5. Butter a 9 by 13-inch glass baking dish. Turn the dough out onto a lightly floured work surface. Gently shape the dough into a rectangle with the long side nearest you. Roll into an 18 by 12-inch rectangle.

6. Brush the dough with the melted butter, leaving 1/2-inch border along the top edge. Sprinkle the filling mixture over the dough, leaving a 3/4-inch border along the top edge; gently press the filling into the dough.  Beginning with the long edge nearest you, roll the dough into a tight cylinder. Firmly pinch the seam to seal and roll the cylinder seam side down. Very gently squeeze the cylinder to create even thickness.

7. Using a serrated knife, slice the cylinder into 1 1/2-inch rolls; yielding 12 rolls. Arrange rolls in the baking dish; cover tightly with plastic wrap and store in the refrigerator overnight or up to 16 hours. [You can decide to freeze at this point – when ready to use – place in refrigerator to defrost]

8. Remove the rolls from the refrigerator and place in an oven that is turned off.  Fill a shallow pan 2/3-full of boiling water and set on the rack below the rolls.  Close the oven door and let the rolls rise until they look slightly puffy; approximately 30 minutes.  Remove the rolls and the shallow pan of water from the oven.

9. Preheat the oven to 350 degrees F.

10. Place the rolls on the middle rack and bake until golden brown, or until the internal temperature reaches 190 degrees F on an instant-read thermometer, approximately 30 minutes.

11. While the rolls are cooling slightly, make the icing by whisking the cream cheese in the bowl of a stand mixer until creamy. Add the milk and whisk until combined. Sift in the powdered sugar, and whisk until smooth. Spread over the rolls and serve immediately.

Source: Alton Brown, Food Network.com

Printer-friendly version

Jan 9, 2012

Lemon Poppy seed Muffins

lemon poppy seed muffins 1

You can’t go wrong with a basic lemon poppy seed muffin.  These are just a little bit better with the addition of a lemon glaze on top.   I made these in my mini-muffin pan, but they work just as well regular sized.  I’ve actually made these a few times already – just never gotten around to blogging them.  It think its finally time to change that!

lemon poppy seed muffins 2

Ingredients

For the muffins

  • 2/3 cup sugar
  • Grated zest and juice of 1 lemon
  • 2 cups all-purpose flour
  • 2 tsp. baking powder
  • 1/4 tsp. baking soda
  • 1/4 tsp. salt
  • 3/4 cup sour cream
  • 2 large eggs
  • 1 tsp. pure vanilla extract
  • 1 stick (8 Tbsp.) unsalted butter, melted and cooled
  • 2 Tbsp. poppy seeds

For the icing

  • 1 cup confectioners’ sugar, sifted
  • 2-3 Tbsp. fresh lemon juice

Directions

1. Preheat the oven to 400 degrees F.  Butter or spray the 12 molds in a regular-size muffin pan or fit the molds with paper muffin cups (or use a mini muffin pan, it will make at least 24 mini muffins). 

2. In a large bowl, rub the sugar and lemon zest together with your fingertips until the sugar is moist and the fragrance of lemon strong.  Whisk in the flour, baking powder, baking soda and salt. 

3. In a large glass measuring cup or another bowl, whisk the sour cream, eggs, vanilla, lemon juice and melted butter together until well blended.

4. Pour the liquid ingredients over the dry ingredients and, with the whisk or rubber spatula, gently but quickly stir to blend.  Don’t worry about being thorough - a few lumps are better than over mixing the batter.  Stir in the poppy seeds.  Divide the batter evenly among the muffin cups.

5. Bake for 18 to 20 minutes (10 to 12 for mini muffins), or until the tops are golden and a thick knife inserted into the center of the muffins comes out clean.  Transfer the pan to a rack and cool for 5 minutes before carefully removing each muffin from its mold.  Cool the muffins completely on the rack before icing them.

6. To make the icing: Put the confectioners’ sugar in a small bowl and add about 1 1/2 tablespoons of the lemon juice.  Stir with a spoon to moisten the sugar, then add enough additional lemon juice, a dribble at a time, to get an icing that is thin enough to drizzle from the tip of the spoon.  You can then drizzle lines of the icing over the tops of the muffins or coat the tops entirely.

Source: Baking: From My Home To Yours, by Dori Greenspan  pages 10 & 11

Printer-friendly version

Dec 16, 2011

Lemon Poppy seed Pancakes & OXO Give-a-way!

lemon poppy seed pancakes 1

Oxo (the makers of numerous ergonomically friendly kitchen and household products) sent me one of their newest items – the Egg Beater to try out! 

I’ve never owned a hand-held egg beater before – and now I’m wondering why!   It is really smooth and easy to quickly mix up this batter (and I’ve also tried it with some scrambled eggs).  Like their other products that I own – the handle is really big and comfortable.  My favorite part is that it comes apart really easily to put into your dishwasher (I hate hand-washing anything).  It is perfect for eggs, batters and small batches of whipped cream.  I’m hoping to get plenty of use out of it in the future – there are lots of times I really don’t need to drag out my stand mixer or even my hand-held electric one.  So this is the perfect alternative.  

lemon poppy seed pancakes 2

Do you want to own one?  Lucky for you OXO also sent me an Egg Beater to give-a-way to one of my readers!  

Please leave a comment in this post (no Anonymous comments) telling me what your favorite breakfast item is?

The Giveaway ends on Midnight EST December 18th, 2011.  Only open to U.S. residents. You may only enter once (duplicate entries from the same IP address will be deleted). Please leave a valid email address or website so I can reach you to claim your prize.  Winner will be chosen based on the number of comments received by random.org.

lemon poppy seed pancakes 4

I don’t want to forget to tell you about these pancakes.  They are the perfect alternative to your usual breakfast, in case you are in a rut.  The lemon zest really makes these taste lemon-y and the poppy seeds give a bit of texture to the pancakes.  I topped them with some sliced strawberries mixed with a bit of maple sugar – which was a nice complement to the lemon flavor in the pancakes.   I definitely plan to make these again soon! Enjoy!

lemon poppy seed pancakes 3

Full Disclosure: I was provided the Oxo Egg Beater for free as part of the Oxo Blogger Outreach program.  However, the opinions in this post are completely mine.

Ingredients

  • 1 cup all-purpose flour
  • 1/2 tsp. baking powder
  • 1/4 tsp. baking soda
  • 2 Tbsp. sugar
  • pinch of salt
  • 2 Tbsp. poppy seeds
  • zest of 1/2 lemon
  • 1 cup milk
  • juice from 1/2 lemon
  • 1 large egg
  • 1 Tbsp. canola oil, plus more for cooking
  • Strawberries and sugar for topping (optional)

Directions

1. Combine the milk and lemon juice in a measuring cup, set aside for 5-10 minutes.

2. Combine the flour, baking powder, baking soda, sugar and salt in a bowl, set aside.

3. In a separate bowl combine the milk (now its actually buttermilk), egg, oil, lemon zest and poppy seeds.  Mix thoroughly to combine.

4. Stir all the ingredients until they are just combined.

5. Heat your skillet or griddle to medium and add a bit of oil. Pour about 1/3 of a cup of batter into the skillet.  Wait until the pancake bottom is deep golden in color, then flip with a spatula and cook the other side until golden and cooked through. Repeat with the remaining batter. 

6. Serve with strawberries, if desired.

Source: adapted from Picky Cook

Printer-friendly version

Jun 13, 2011

Morning glory Muffins

morning glory muffings

I get quite a few cooking magazines in the mail – and even though I read a ton of food blogs – I love sitting down and flipping through my latest Cook’s Country, Cooks Illustrated or Everyday Food magazine.   These muffins immediately caught my attention – not only because of their appealing name – they are chock full of tons of things I love.  They have carrots, coconut, apple, pineapple, walnuts and raisins.   I also feel that a food processor is a must with this recipe – or else you will be doing a lot of chopping and shredding on your own.  I am not lying even with the food processor – these muffins do take quite a bit of prep work to get made, they are surprisingly involved for a muffin.  Luckily they came out super moist and really flavorful – definitely worth making your morning glorious by eating one! 

Ingredients

  • 3/4 sweetened shredded coconut, toasted
  • 1/2 cup walnuts, toasted
  • 2 1/4 cups all-purpose flour
  • 3/4 cup sugar
  • 1 1/2 tsp. baking soda
  • 1 tsp. cinnamon
  • 1/2 tsp. baking powder
  • 3/4 tsp. salt
  • 1 (8-oz.) can crushed pineapple
  • 1 Granny smith apple, peeled, cored and shredded
  • 8 Tbsp. (1 stick) unsalted butter, melted and cooled
  • 3 large eggs
  • 1 tsp. vanilla extract
  • 1 1/2 cups shredded carrots (2-3 medium sized)
  • 1 cup golden raisins

Directions

1. Preheat oven to 350 degrees F. Grease a 12-cup muffin tin.

2. Toast coconut in a dry skillet on medium heat until golden brown.  Place in food processor.  Then toast walnuts in same skillet until toasted.  Place in food processor.

3. Process coconut and walnuts until finely ground.  Add flour, sugar, baking soda, cinnamon, baking powder and salt and pulse to combine.   Transfer mixture to a large bowl and set aside.

4. Shred apple in now empty food processor (with shredding blade) and set in a large fine-mesh strainer set over a liquid measuring cup.   Add pineapple to strainer.  Press fruit dry – juice should measure about 1 cup.   Bring juice to a boil in a large skillet set over medium-high heat and reduce until 1/4 cup.  Let cool slightly.

5. Combine juice with melted butter, eggs and vanilla and whisk to combine. 

6. Shred carrots in now empty food processor (with shredding blade).

7. Combine wet and dry ingredients until just combined.  Add in pineapple-apple mixture, carrots and raisins. 

8. Divide evenly into muffin cups.  Bake for 24-28 minutes until toothpick comes out clean when pressed in the center of a muffin.  Cool for 10 minutes in pan and then cool completely on wire rack.  

Source: Cook’s Country April/May 2011

Printer-friendly version

Mar 27, 2011

Daring Bakers: Yeasted Meringue Coffee Cake

DB coffee cake 5

The March 2011 Daring Baker’s Challenge was hosted by Ria of Ria’s Collection and Jamie of Life’s a Feast. Ria and Jamie challenged The Daring Bakers to bake a yeasted Meringue Coffee Cake.

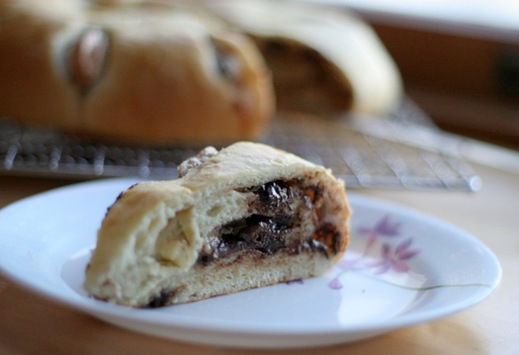
I was completely pre-occupied this month and almost forgot to make this months challenge.  Luckily, this recipe was made entirely out of staples that I always have on hand – so it was easy to whip up at the last minute.  I’ve never made a sweet yeasted dough – so I was excited to try it.  The dough itself was really smooth and easy to roll out. 

It is filled with a simple egg white meringue and topped with cinnamon, sugar, walnuts and chocolate chips. 

DB coffee cake 1

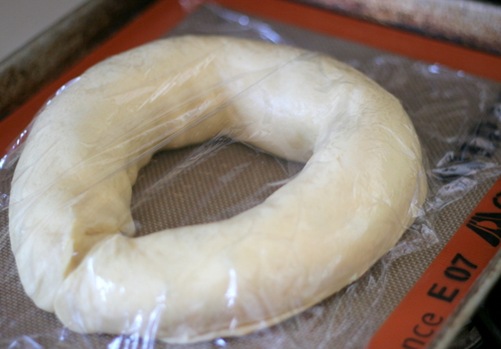
The dough then gets rolled into a wreath and allowed to rise again.
DB coffee cake 2

Once ready to bake it is topped with egg wash and slit open.

DB coffee cake 3

The finished product is golden brown and delicious.  The dough is not at all overly sweet and the walnuts add a nice crunch.   The chocolate chips make this more like a dessert than a breakfast – but I could eat this any time of the day and be completely satisfied!

Don’t forget to check out the Daring Bakers blogroll to see how everyone else's coffee cakes turned out!  YUM!

DB coffee cake 4

Ingredients

For the yeast coffee cake dough:

  • 2 cups all-purpose flour
  • 2 Tbsp. sugar
  • 1/2 tsp. salt
  • 1 1/8 tsp. instant yeast
  • 1/4 cup plus 2 Tbsp. milk
  • 2 Tbsp. water
  • 1/4 cup unsalted butter
  • 1 large egg, at room temperature

For the meringue:

  • 2 large egg whites, at room temperature
  • 1/8 tsp. salt
  • 1/2 tsp. vanilla
  • 1/4 cup sugar

For the filling:

  • 1/2 cup chopped pecans or walnuts
  • 1 Tbsp. granulated sugar
  • 1/4 tsp. ground cinnamon
  • 1/2 cup semisweet chocolate chips

egg wash (leftover egg yolks & water)

powdered sugar or cocoa powder for dusting (optional)

Directions

Prepare the dough:

1. In the mixing bowl for a stand mixer, combine 3/4 cup of the flour, the sugar, salt and yeast.

2. In a small saucepan, combine the milk, water and butter and heat over medium heat until warm and the butter is just melted.

3. With the mixer on low speed fitted with the paddle attachment, gradually add the warm liquid to the flour/yeast mixture, beating until well blended.  Increase mixer speed to medium and beat 2 minutes.

4. Add the egg and 1/2 cup flour and beat for 2 more minutes.

5. Add the remaining 3/4 cup flour and switch to the dough hook. Knead the dough over medium speed for 5-6 minutes. 

6. Place the dough in a lightly greased bowl, turning to coat all sides. Cover the bowl with plastic wrap and let rise until double in bulk, 45 – 60 minutes.

Prepare your fillings:

1. In a small bowl, combine the cinnamon, sugar, nuts and chocolate chips, set aside.

2. In a clean mixing bowl fitted with the whisk attachment, beat the egg whites with the salt, first on low speed for 30 seconds, then increase to high and continue beating until foamy and opaque. Add the vanilla then start adding the 1/4 cup sugar, a tablespoon at a time as you beat, until very stiff, glossy peaks form.

Assemble and bake the Coffee Cake:

1. Line a baking sheets with parchment paper or a silpat.

2. On a lightly floured surface or a pastry mat, roll out the dough into a 20 x 10-inch rectangle. Spread the meringue evenly over the rectangle up to about 1/2-inch from the edges. Sprinkle the your filling evenly over the meringue.

3. Roll up the dough jellyroll style, from the long side. Pinch the seam closed to seal.

4. Carefully transfer the filled log to the baking sheet, seam side down. Bring the ends of the log around and seal the ends together, forming a ring, tucking one end into the other and pinching to seal.

5. Cover with plastic wrap and allow to rise for 45 minutes.

6. Using kitchen scissors or a sharp knife, make cuts along the outside edge at 1-inch intervals. Make them as shallow or as deep as desired but don’t be afraid to cut deep into the ring.

7. Preheat the oven to 350°F.

8. Brush the top of the coffee cake with the egg wash.

9. Bake in the preheated oven for 25 to 30 minutes until risen and golden brown. The dough should sound hollow when tapped.

10. Remove from the oven and allow to cool on baking sheet for 10 minutes.  Then carefully remove to a cooling rack to cool completely.

11. Just before serving, dust the tops of the coffee cakes with confectioner’s sugar and cocoa powder, if desired. This best eaten fresh, the same day or the next day.

Source: Jamie of Life’s a Feast – The Daring Bakers March 2011 challenge

Printer-friendly version

Mar 21, 2011

Sour Cream Toffee Coffee Cake

sour cream toffee coffee cake 1

I’m not a fan of sour cream in traditional applications – such as on tacos or on baked potatoes.  But it is really useful in baked goods at keeping the dessert moist.  I had a leftover container of sour cream in my fridge – and that was the entire reason for making this recipe – since I knew I would end up just throwing it away otherwise.  And I’m so glad I found it since I haven’t had a chance to use my bundt pan in a while.

sour cream toffee coffee cake 3

I have to admit though – I made this for my husband to take with him to work – so I didn’t get to try any.   I did nicely ask that he bring me back a slice if there was any left – well, if it’s a testament to the cake or that my husband is just forgetful – I never got that slice to try.   But I can assure you that it got rave reviews – and there are over 200 5-star reviews on Food Network – so that means something too. 

The only change I made was substituting toffee for the walnuts – I thought it would go really well in a coffee cake – but you can also use walnuts or pecans. Enjoy!

sour cream toffee coffee cake 2

Ingredients

  • 12 Tbsp. (1 1/2 sticks) unsalted butter, at room temperature
  • 1 1/2 cups granulated sugar
  • 3 eggs, at room temperature
  • 1 1/2 tsp. vanilla extract
  • 1 1/4 cups sour cream
  • 2 1/2 cups cake flour
  • 2 tsp. baking powder
  • 1/2 tsp. baking soda
  • 1/2 tsp. kosher salt

for the streusel:

  • 1/4 cup light brown sugar, packed
  • 1/2 cup all-purpose flour
  • 1 1/2 teaspoons ground cinnamon
  • 1/4 teaspoon kosher salt
  • 3 Tbsp. cold unsalted butter, cut into pieces
  • 1/2 toffee bits or 3/4 cup chopped walnuts or pecans

for the glaze:

  • 1/2 – 3/4 cup confectioners' sugar
  • 2 Tbsp. real maple syrup

Directions

1. Preheat the oven to 350 degrees F. Grease and flour a bundt pan.

2. Cream the butter and sugar in the bowl of an electric mixer fitted with the paddle attachment for 4 to 5 minutes, until light and fluffy.

3. Add the eggs 1 at a time, then add the vanilla and sour cream.

4. In a separate bowl, sift together the flour, baking powder, baking soda, and salt.

5. With the mixer on low, add the flour mixture to the batter until just combined. Finish stirring with a spatula to be sure the batter is completely mixed.

6. For the streusel, place the brown sugar, flour, cinnamon, salt, and butter in a bowl and pinch together with your fingers until it forms a crumble. Mix in the toffee or nuts.

7. Sprinkle half the streusel in the pan. Spoon half the batter into the pan and spread it out with a knife. Sprinkle with remaining streusel. Spoon the rest of the batter in the pan, spread it out.

8. Bake for 50 to 60 minutes, until a cake tester comes out clean.

9. Let cool on a wire rack for at least 30 minutes, then remove from pan by flipping onto a serving plate.

10.  Whisk the confectioners' sugar and maple syrup together, adding a few drops of water if necessary, to make the glaze runny. Drizzle as much as you like over the cake with a fork or spoon.

Source: Ina Garten, Food Network

Printer-friendly version

Feb 8, 2011

Coffeecake Muffins

coffeecake muffins 1
I am a sucker for a good crumb topping – put it on anything and I’ll enjoy it (well, maybe not everything).  These ingenious muffins – not only have the perfect crumb topping – it is also mixed throughout the batter.  Why did I not think of this myself?   Making these also reminded me that I haven’t made my favorite coffee cake recipe in forever – so I really need to get on that stat! 
The other thing that I loved about these is that they are entirely made in the food processor.  You first make the crumb topping and then the rest of the batter – no dirtying both the food processor and mixer.  And less dirty dishes is definitely a win-win in my book. 
coffeecake muffins 2
So grab your morning (afternoon or evening) cup of coffee and enjoy these muffins.  I know I sure did.  
coffeecake muffins 3
Ingredients
  • 1/2 cup pecans
  • 1/4 cup packed dark brown sugar
  • 1 tsp. ground cinnamon
  • 2 cups unbleached all-purpose flour
  • 1 cup granulated sugar
  • 1 tsp. salt
  • 8 Tbsp. unsalted butter, cut into 1/2" pieces and softened
  • 1 1/2 tsp. baking powder
  • 1/2 tsp. baking soda
  • 3/4 cup sour cream
  • 1 large egg
  • 1 tsp. vanilla extract
Directions
1. Adjust oven rack to middle position and heat oven to 350 degrees. Line a 12-cup muffin pan with paper liners and set aside.
2. Process nuts, brown sugar, and cinnamon in food processor until nuts are the size of sesame seeds, about ten 1-second pulses. Transfer mixture to medium bowl and set aside.
3. Return bowl and metal blade to food processor, add flour, granulated sugar, and salt and process until combined, about five 1-second pulses.
4. Sprinkle butter evenly over flour mixture and process until butter is oat-sized, about eight 1-second pulses.  Remove 1 cup of the flour-butter mixture and stir with fork into reserved brown sugar mixture until combined to make streusel.
5. Set aside 3/4 cup of streusel for muffin batter and remaining portion for topping muffins.
6. Add baking powder and baking soda to remaining flour mixture in food processor bowl and process until combined, about five 1-second pulses.
7. Whisk together sour cream, egg, and vanilla; add to flour mixture. Process until batter is just moistened, about five 1-second pulses.
8. Add 3/4 cup reserved streusel to flour mixture and process until just distributed throughout batter, about five 1-second pulses.
9. Divide batter among 12 muffin cups and sprinkle with streusel, pressing lightly so that streusel sinks slightly into batter.
10. Bake until toothpick inserted in center of muffin comes out with several crumbs clinging to it, about 18 minutes, rotating pan from front to back halfway through baking time. Cool muffin tin on wire rack for 2 minutes, then remove and cool on wire rack until ready to serve.
Source: Cook’s Illustrated as seen on Amber’s Delectable Delights
Printer-friendly version

Feb 2, 2011

Whole wheat Pancakes

wheat pancakes 1

Ah, Sunday morning breakfast – the smell of the weekend.  I end up making waffles or pancakes, since my husband doesn’t eat eggs (which are my favorite breakfast item).  I wanted to make a whole wheat pancake to add a little more fiber to our breakfast.  What I love about pancakes is that I can customize them to the person – I love blueberries in mine and my husband likes chocolate chips in his (tastes like a giant chocolate chip cookie).  I loved how simple these were to make and how fluffy they turned out.  Definitely a keeper.  Enjoy!

wheat pancakes 2

Ingredients

  • 1 cup whole wheat flour
  • 1/2 tsp. baking powder
  • 1/4 tsp. baking soda
  • 1/2 tsp. salt
  • 1 1/2 Tbsp. sugar
  • 1 large egg
  • 1 cup buttermilk
  • 2 Tbsp. unsalted butter, melted and cooled

Directions

1. Mix together all of the dry ingredients in a large bowl.

2. Whisk together all of the wet ingredients in a measuring cup.

3. Add the wet ingredients to the dry and mix to combine – just until all ingredients are blended.  Let rest for 5 minutes.

4. Heat a griddle or non-stick frying pan over medium-low heat for several minutes.

5. Spoon pancake batter into pan and cook until bubbles form in the batter and bottom is golden, approximately three minutes [at this point – add in any fillings you want to use].  Flip and cook until the second side is golden, another a minute or so.

Source: Alton Brown – I’m just here for more food

Printer-friendly version

Jan 17, 2011

Yeasted Waffles

yeasted waffles 3

Do you want to know the perfect Sunday morning breakfast?  Well – it’s yeasted waffles.  Essentially you mix together almost all of the ingredients the night before – and in the morning you add a bit of baking soda and crack an egg – and you have waffle batter. Even better than that is that you house will smell like fresh baked bread!  Does it get any better than that?  And if you run your dishwasher the night before – you won’t even have any dishes to do! Winking smile 

yeasted waffles 1

This is the batter when you wake up in the morning – look at all of those yeast bubbles!

The best part is that they tasted even better than I expected – so you can’t beat that!   Enjoy!

yeasted waffles 2

Ingredients

  • 1/4 cup warm water
  • 1 1/8 tsp. active dry yeast
  • 1 cup milk, warmed
  • 4 Tbsp. unsalted butter, melted and cooled slightly
  • 1/2 tsp. salt
  • 1/2 tsp. sugar
  • 1 cup all-purpose flour
  • 1 large egg, lightly beaten
  • 1/8 tsp. baking soda

Directions

1. Combine the water and yeast in a large mixing bowl and let stand for 5 minutes.

2. Add the milk, butter, salt, sugar and flour to the bowl.  Whisk until well blended and smooth.

3. Cover the bowl with plastic wrap and let stand at room temperature overnight.

4. When you are ready to make the waffles, preheat the waffle iron.

5.  Whisk the eggs and baking soda into the batter until smooth (the batter will be thin).

6. Fill waffle wells and cook according to the manufacturer’s instructions.  Cook until crisp and golden. 

Source: Annie’s Eats, who adapted from Orangette, originally from The Breakfast Book by Marion Cunningham

Printer-friendly version

Dec 21, 2010

Blueberry Scones

blueberry scones 1

Scones have become my new favorite breakfast treat to make.  Over the summer, during peak season – I bought a massive quantity of blueberries for my freezer.  Besides throwing them into my yogurt or into pancakes – I haven’t done much else with them.  Well, not until making these scones.  Oh my – are these amazing or what?!  They are tender, flaky and the perfect contrast to the juicy sweet blueberry.  It’s like a little bite of summer in the midst of winter.

blueberry scones 2

Can’t wait to make these again!  YUM!

blueberry scones 3

Ingredients

  • 8 tbsp. (1 stick) unsalted butter, frozen whole
  • 1 1/2 cups fresh or frozen blueberries
  • 1/2 cup whole milk
  • 1/2 cup sour cream
  • 2 cups all-purpose flour, plus more for dusting the work surface
  • 1/2 cup sugar, plus extra for sprinkling
  • 2 tsp. baking powder
  • 1/4 tsp. baking soda
  • 1/2 tsp. salt
  • 1 tsp. finely grated lemon zest
  • 2 Tbsp. unsalted butter, melted

Directions

1. Adjust an oven rack to middle position and preheat to 425˚ F. 

2. Grate the frozen butter on the holes of a large box grater. 

3. Whisk together the milk and sour cream in a medium bowl; refrigerate until needed. 

4. Combine the flour, 1/2 cup sugar, baking powder, baking soda, salt and lemon zest in a medium mixing bowl.  Whisk to combine. 

5. Add the grated butter to the flour mixture and toss with fingers until thoroughly coated.

6. Add the milk mixture to the dry ingredients and fold with a spatula just until combined. 

7. Transfer the dough to a generously floured work surface.  Dust the top of the dough with flour, and knead with well floured hands, 6-8 times, just until the dough holds together in a ragged ball.  Add small amounts of flour as needed to prevent sticking.

8. Roll the dough into a 12-inch square.  Fold the dough into thirds like a business letter (a dough scraper really helps with these steps).  Fold the short ends of the dough into the center in thirds, to form an approximate 4-inch square.  Transfer the dough to a plate lightly dusted with flour and chill in the freezer for 5 minutes.

9. Return the dough to the floured work surface and roll into an approximately 12-inch square again.  Sprinkle the blueberries evenly over the surface of the dough, and gently press down so that they are slightly embedded in the dough surface.  Using a dough scraper, roll the dough up to form a tight log.  Lay the log seam side down and press the the log into a 12 by 4-inch rectangle. 

10. Using a sharp, floured knife, cut the rectangle crosswise into 4 equal rectangles.  Cut each rectangle diagonally to form 2 triangles.  Transfer to a parchment lined baking sheet.

11. Brush the tops of the scones with melted butter and sprinkle lightly with sugar. 

12. Bake until the tops and bottoms are golden brown, 18-25 minutes.  Transfer to a wire rack and let cool at least 10 minutes before serving.

Source: Cooks Illustrated via Annie’s Eats

Printer-friendly version

Nov 16, 2010

Banana Bread

banana bread 1

Banana bread is one of those things that I’ve made many, many times – but I never had a ‘go-to’ recipe.  I always just searched for a recipe and tried a new one each time.  I’ve experienced the dry crumbly loaves and also the uncooked mushy middle – but I can put all of that aside now.  Because I found the winner – it has a whopping 6 whole bananas and even one sliced on top.  The bread was perfectly moist and I loved the crispy outside and the bananas on top caramelized in the oven.  I know for a fact I will be making this bread again and again!  I like to keep any bananas that get too ripe in the freezer to have on hand at a moments notice – and that ended up being perfect for this recipe.  You can also use fresh – but make sure you let them ripen – so you really have to plan ahead (which is why I like to have a supply in the freezer).   Enjoy! 

banana bread 3banana bread 4

Ingredients

  • 1 3/4 cups all-purpose flour
  • 1 tsp. baking soda
  • 1/2 tsp. salt
  • 6 large, very ripe bananas (about 2¼ lbs.), peeled or 5 thawed, frozen bananas and 1 fresh banana 
  • 8 Tbsp. (1 stick) unsalted butter, melted and cooled slightly
  • 2 large eggs
  • 3/4 cup packed light brown sugar
  • 1 tsp. vanilla extract
  • 1/2 cup walnuts, toasted and coarsely chopped
  • 2 tsp. granulated sugar

Directions

1. Preheat the oven to 350˚ F. 

2. Lightly spray a loaf pan (8 1/2 by 4 1/2 inches) with nonstick cooking spray. 

3. In a medium bowl, combine the flour, baking soda and salt; whisk together and set aside.

4. [You can skip this step if using previously frozen and thawed bananas and move onto step 5] Place 5 bananas in a microwave safe bowl; cover with plastic wrap and make several slits in the wrap with a paring knife to act as steam vents.  Microwave on high until the bananas are soft and have released liquid, about 5 minutes. 

5. Transfer the bananas to a fine mesh strainer set over a medium bowl and let drain, stirring occasionally, about 15 minutes (you should have about 1/2 cup liquid).

6. Transfer the reserved banana liquid to a medium saucepan over medium-high heat.  Cook until reduced to about ¼ cup, 5-10 minutes.  Remove the pan from the heat.

7. In a large bowl, combine the bananas and the reduced banana liquid.  Mash together until fairly smooth. 

8. Whisk in the melted butter, eggs, brown sugar and vanilla.

9. Add the dry ingredients to the bowl with the banana mixture.  Fold together gently, just until all of the dry ingredients are incorporated.  Gently fold in the walnuts.

10. Pour the batter into the prepared pan and smooth with a spatula.

11. Slice the remaining banana diagonally into ¼-inch thick slices.  Layer the banana slices along both sides of the top of the batter, leaving a 1 1/2 inch wide space down the center to allow an even rise.  Sprinkle the sugar evenly over the assembled loaf.

12. Bake until a toothpick inserted in the center comes out clean, 55-75 minutes.  Transfer to a wire rack and allow to cool at least 15 minutes in the pan before removing and continuing to cool on the wire rack. Serve warm or at room temperature.

Source: Cook’s Illustrated, July & August 2010

Printer-friendly version

Nov 10, 2010

Pumpkin Spice Pancakes

pumpkin spice pancakes 1

I am really into pumpkin lately – and it is really no surprise – since it is seasonal right now and so yummy.  I’ve had my eye on these pancakes for awhile now – and they are perfect with a pumpkin spice latte on a cool Fall morning.  It is also the perfect way to use up some leftover pumpkin from any other treats you may have made recently.

Ingredients

  • 1 1/4 cups all-purpose flour
  • 2 Tbsp. brown sugar
  • 2 tsp. baking powder
  • 1/4 tsp. salt
  • 3/4 tsp. ground cinnamon
  • 1/4 tsp. ground nutmeg
  • Dash of ground ginger
  • Dash of ground cloves
  • 1 cup milk
  • 1/2 cup pumpkin puree
  • 1 large egg
  • 2 Tbsp. vegetable oil or melted butter

Directions

1. In a medium mixing bowl, combine the flour, brown sugar, baking powder, salt and spices and stir with a whisk to combine. 

2. Mix together the milk, pumpkin puree, egg and oil or butter in a liquid measuring cup. 

3. Add the wet ingredients to the dry ingredients and whisk together just until combine. 

4. Heat a greased skillet or griddle over medium heat.  Once the skillet is hot, add a 1/3 cup scoop of batter to the pan.  Let cool until bubbles begin to form on the top surface.  Carefully flip with a spatula and cook the second side until golden brown, a couple minutes more.  Repeat with the rest of the batter until it has all been cooked, regreasing the pan as needed.  Serve with cinnamon sugar, maple syrup, and/or whipped cream.

Source: Annie’s Eats who adapted from Joy the Baker, originally from Martha Stewart

Printer-friendly version

Sep 7, 2010

Zucchini Muffins

Well, apparently it is zucchini week on my blog since my post yesterday used zucchini and so does my post for tomorrow :)
These muffins are the perfect way to use up some zucchini – you could also make this into a bread – but I like muffins better for convenience.  They bake quicker and are easier to eat too.   There is some lemon zest in this recipe – which really imparts some fresh flavor – so definitely don’t cut that out!  Enjoy one of these before summer is over in a few weeks!

Ingredients

  • 2 cups all-purpose flour
  • 1 pound zucchini, washed and dried, ends and stems removed, cut in half lengthwise and seeded if using large zucchini, each half cut into 1-inch pieces
  • 3/4 cup sugar
  • 1/2 cup pecans or walnuts, chopped coarse
  • 1 tsp. baking soda
  • 1 tsp. baking powder
  • 1/2 tsp. salt
  • 1/4 cup plain yogurt
  • 2 large eggs, beaten lightly
  • 1 Tbsp. lemon juice
  • 6 tablespoons unsalted butter, melted and cooled

Directions

1. Adjust an oven rack to the middle position and heat the oven to 375 degrees.

2. Grease the bottom and sides of 12 muffin cups or line with paper liners.

3. In the bowl of a food processor fitted with the metal blade, process the zucchini and 2 tablespoons of the sugar until the zucchini is coarsely shredded, twelve to fifteen 1-second pulses.

4. Transfer the mixture to a fine-mesh strainer set at least 2 inches over a bowl and allow to drain for 30 minutes.

5. Meanwhile, spread the nuts on a baking sheet and toast until fragrant, 5 to 7 minutes. Transfer the nuts to a cooling rack and cool completely. Transfer the nuts to a large bowl; add the flour, baking soda, baking powder, and salt, and whisk until combined. Set aside.

6. Whisk together the remaining 1/2 cup plus 2 tablespoons of sugar, yogurt, eggs, lemon juice, and melted butter in a medium bowl until combined. Set aside.

7. After the zucchini has drained, squeeze the zucchini with several layers of paper towels to absorb excess moisture.

8. Stir the zucchini and the yogurt mixture into the flour mixture until just moistened.  Spoon the batter into the muffin cups.

9. Bake until the loaf is golden brown and a skewer inserted in the center comes out clean, 18-25 minutes, rotating the pan halfway through baking. Cool in the pan for 10 minutes, then transfer to a wire rack and cool for at least one hour before serving.

Source: Cook’s Illustrated via The Way the Cookies Crumbles

Printer-friendly version

Aug 20, 2010

Peach Jam Scones

This is my weekly summer peach recipe – I added these to my baking list immediately after seeing them on so many blogs a few weeks ago as part of project pastry queen.  They looked so delicious – I had to try them right away.  I also made my own vanilla bean - peach jam last summer (pre-blog so no recipe to share!) and I still had a jar of it – that was perfect for this recipe.  
I made 2/3 of the original recipe and it still gave me 12 large scones!  I ended up freezing the 8 scones that I didn’t immediately cook – so I can make them for an easy breakfast treat anytime!  I’ve been freezing so many things lately, I feel like I need an second freezer just to keep up.   Enjoy!

Ingredients

(this is the full recipe – it will make HUGE scones – so it may be best to halve or make 2/3 of this recipe)

  • 6 cups all purpose flour
  • 1 1/4 cup granulated sugar
  • 1/4 cup baking powder
  • 1/4 tsp salt
  • 1 1/2 cups (3 sticks) unsalted butter, chilled
  • 1 1/2 – 2 cups buttermilk
  • 1/2 cup high quality peach jam
  • 3 fresh peaches, pitted & sliced

Directions

1. Preheat oven to 425 degrees F (if baking immediately).

2. In the bowl of a food processor fitted with a metal blade, process the flour, 1 cup of sugar, the baking powder and salt for about 30 seconds.

3. Cut the butter into 1/2-inch cubes and add it to the flour mixture. Pulse about 15 times, until the butter-flour mixture is crumbly.

4. With the processor running, slowly pour 1 1/2 cups buttermilk through the feed tube. Stop the processor as soon as the buttermilk has been added. If the dough has begun to stick together in a ball, remove it. Otherwise, add buttermilk one Tablespoon at a time and pulse until dough begins to clump up and form a ball.

5. Place the dough on a lightly floured flat surface. Pat dough into a 1/4-inch-thick rectangle, about 12×10 inches.

6. Spread a thin layer of jam length-wise over half the dough and arrange the peach slices in a single layer on top of the jam.

7. Fold the plain dough over the peaches making a 12 by 5-inch rectangle with the jam & peaches inside. Cut into 8-16 triangles and sprinkle the top with the remaining 1/4 cup sugar.

8. Bake on an ungreased baking sheet for 10-15 minutes until golden brown. Serve warm or at room temperature.

note: if freezing – shape and cut dough – then place on baking sheets in the freezer until solid frozen. Then store in freezer bags.  When ready to bake – preheat oven to 425 degrees F and bake for 15-20 minutes, until golden brown. 

Source: The Pastry Queen by Rebecca Rather, as seen on Delish

Printer-friendly version

Aug 2, 2010

Buttermilk Waffles

 
Waffle batter and my rainbow whisk!
Waffles are one of those things that I really love but I don’t make often or even eat that often.  If for some reason I go out for breakfast – which is very, very rarely I almost always order an omelet.   Luckily (and unlucky for me) my camera decided to somehow lose a bunch of photos I took.  And well, these waffles were too good to not make again right way just so I could blog about them.  I think they are going to be something I make again and again.   They are quick to whip up and while the batter rests, you can pre-heat the waffle iron and get together your toppings together.     
The first time I made these I topped with some fresh local strawberries – and this time with some fresh blueberries – and of course, real maple syrup. Whatever you use top these with – they are sure to be a hit for a weekend morning breakfast.  Enjoy!

Ingredients

  • 3/4 cup all-purpose flour
  • 1/4 cup cornstarch
  • 1/2 tsp. baking powder
  • 1/4 tsp. baking soda
  • 1/2 tsp. table salt
  • 1 1/2 tsp. sugar
  • 1 cup buttermilk
  • 1/3 cup vegetable oil
  • 1 large egg, lightly beaten
  • 1 tsp. vanilla extract

Directions

1. In a medium bowl, combine the flour, cornstarch, baking powder, baking soda, salt, and sugar. Whisk well.

2. Add the milk, buttermilk, vegetable oil, egg, and vanilla extract. Whisk to blend well, so that few (if any) lumps remain. Set aside to rest for about 30 minutes.

3. Preheat a waffle iron on a medium color setting (will vary depending on your waffle maker).

4. Pour an appropriate amount of batter into your hot waffle maker (depending on shape and size of your maker – mine makes 3 waffles with this recipe). Cook until golden and crisp.

Source: Orangette

Printer-friendly version